Tags: camtasia

RSS - Atom - Subscribe via email

How I animate sketches with Autodesk Sketchbook Pro and Camtasia Studio

Posted: - Modified: | drawing, process, video

Spoken words can be much more effective when accompanied with animation, so my clients have been asking me to put together short animations for them. Here's my workflow in case you're interested in doing this too.

Step 1: Draw the images and get them approved.

Make your canvas roughly the same size as your final image so that you can save frames if needed. The bottom layer should be your background colour (ex: white). You can use a grid to line things up, then hide the grid when you're ready to export. Use one layer per scene in your animation.

Step 1: Draw the image - get it approved if necessary

Draw the image – get it approved if necessary

Step 2: Prepare for animation.

Hide everything but the first scene and your background layer. Add a white layer at 90% opacity above your sketch. This allows you to trace over your sketch while making it easy to remove the pre-sketch in Camtasia Studio. Using a translucent white layer allows you to fade your other scenes without adjusting the opacity for each of them.

Step 2: Prepare for animation

Prepare for animation

Step 3: Lay out your screen.

Zoom in as close to 100% as possible. Use TAB to hide the Autodesk Sketchbook interface and position your sketch so that the important parts are not obscured by the little lagoon controller on the left side. You can turn the title bar off, too. Set Camtasia Recorder to record your screen without that little controller – you can either record only part of your screen, or add a white callout afterwards.
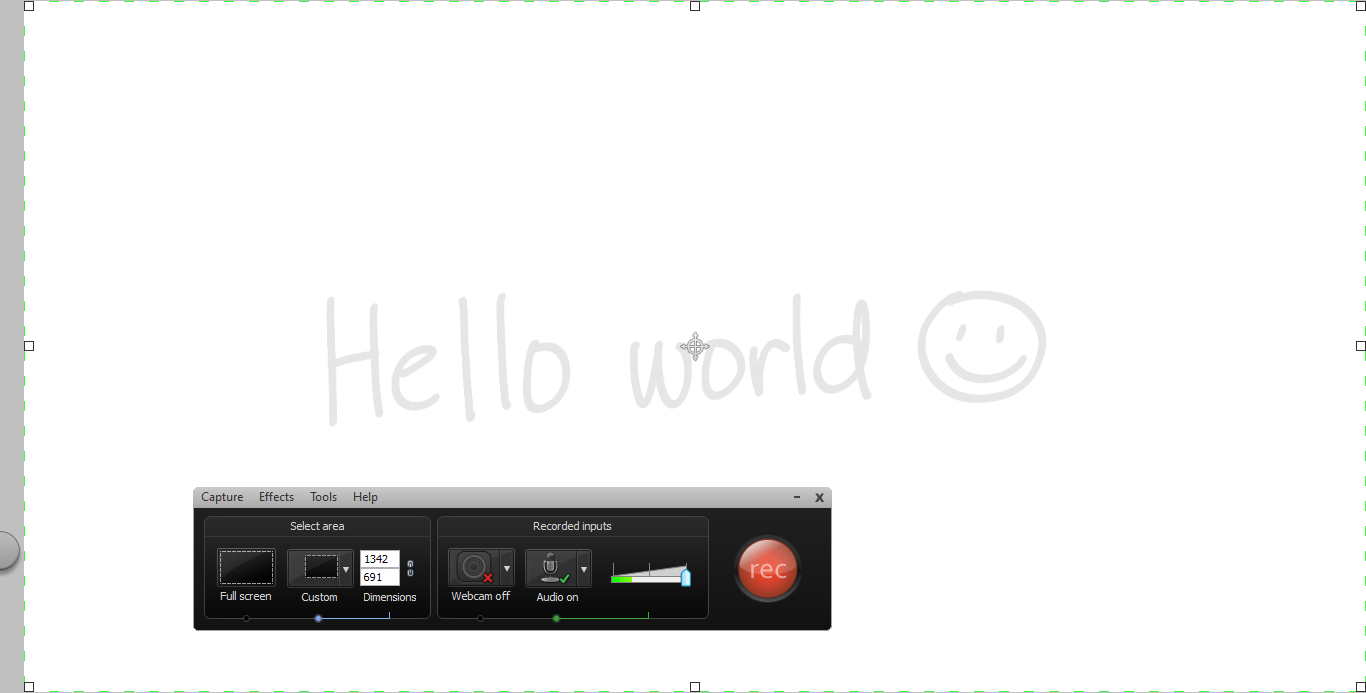
Lay out your screen

Lay out your screen

If you need to create HD video, a high-resolution monitor will give you the space you need. My Cintiq 12WX has a resolution of 1280×800, and my laptop has a resolution of 1366×768. When I need to record at 1920×1080, I use my Cintiq as a graphics tablet for an external monitor instead.

It's probably a good idea to turn audio off so that you don't have to split it out and remove it later.
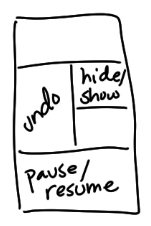
Cintiq buttons

Cintiq buttons

This is also a good time to set up convenient keyboard shortcuts or buttons. The Cintiq 12WX has some programmable buttons, so here's how I set mine up:

  • Left button: Ctrl-z – handy for quickly undoing things instead of flipping over to the eraser.
  • Middle right button: TAB – hides and shows the interface.
  • Bottom button: Ctrl-Shift-F8 – the keyboard shortcut I set up my Camtasia Studio with, so I can pause and resume recording.

This makes it easier for me to pause (bottom), show the interface (middle right), change colours or brushes, hide the interface (middle right), and resume (bottom). That reduces the editing I need to do afterwards.

Step 4: Record!

Because the pre-sketch shows you where things should go and you've already fiddled with the layout to make sure things fit, it's easy to draw quickly and confidently. Use TAB to hide or show the interface. When you're starting out, you may find it easier to record in one go and then edit out the segments when you're switching brushes or colours. As you become more comfortable with switching back and forth between full-screen drawing and using the Autodesk Sketchbook Pro interface, try the workflow that involves pausing the screen, showing the interface, hiding the interface, and then resuming the recording.

Step 5: Edit and synchronize in Camtasia Studio.

Save and edit the video. Set it to the recording dimensions of your final output, and set the background colour to white.

Use Visual Effects > Remove a Color to remove the pre-sketch. Now it looks like you're drawing on a blank canvas. See my previous notes for a demo.

Now synchronize the video with the audio. You may want to add markers to your audio so that you can easily tell where the significant points are. Use the timeline to find out the duration between markers. Split your video at the appropriate points by selecting the video and typing s. Use clip speed (right-click on the segment) to adjust the speed until the video duration matches what you need.

Note that at high clip speeds, Camtasia drops a lot of frames. If this bothers you, you can render the sketch at 400% speed using Camtasia or Movie Maker, produce that as an AVI or MP4, re-import that media, and continue compressing it at a maximum of 400% speed each time until you get the speed you want.

If you need to cover up a mistake, a simple white rectangular callout can hide that effectively. If you need to make something longer, extend the frame. Because you can't extend frames into video that's already there, you may want to drag the segment onto a different track, and then split or cut the excess.

Produce the synchronized video in your required output format (ex: MP4, MOV…) and you're done!

Hope this workflow helps you get into doing more animated sketches with Autodesk Sketchbook Pro and Camtasia Studio on a laptop or desktop computer. Do you use other tools or other workflows? Please share!

How to cheat when animating sketches

| drawing, geek, process, tips

I’ve been working on some animations for my consulting engagement. My new “green-screen” workflow involves Camtasia Studio’s Replace a Color feature, a large secondary motor, and the Cintiq 12 WX (although any USB tablet will probably do fine). It works really well! I re-rendered my 4-minute video because I wanted to use the WAV export as the audio instead of the MP3 export – better audio quality.

My old workflow (Artrage Studio Pro script recording and then some text manipulation to get it to save frames) ran about 4 hours per audio minute. This one’s at about two hours per audio minute, and it could take even less of my time if I could delegate the editing and synchronization to someone else. (Not for this one because of the contract, but maybe next time!)

Here are some other ways to cheat when animating sketches. Click on the image for a larger version.

2013-11-08 How to cheat when animating sketches

No samples, sorry, but maybe I’ll plan my own animations after this consulting project is finished.

In the meantime, here’s a quick glimpse of how to use Remove a Color in Camtasia Studio:

Oooh, Camtasia Studio 8.1 now has green-screening–which means awesome sketch videos just got easier!

Posted: - Modified: | drawing, geek

When I got today’s e-mail announcement of Camtasia Studio 8.1, I was super-excited. You see, one of the new features is Remove Colour, which is also known as green-screening (although you can use other colours if you want). This is great for people who want to splice video with other video, like dropping in another background or placing your video on top of your screenshots. Getting an evenly-lit, well-coloured background can be a challenge when doing green-screening…

… but if you’re drawing digitally, it’s a piece of cake. =) And it lets you do cool stuff! See below:

In the past, I’ve done a few short animations using digital sketches. To keep things on track without running out of space, I pre-draw my sketches, then trace over them. I used Artrage Studio Pro for this because it allowed you to record and replay drawing strokes, so I could draw everything, start recording, and then redraw the image. I like Autodesk Sketchbook Pro much better, though. I’d been thinking about buying a separate video editing program to handle greenscreening, but having it built into Camtasia Studio is even better.

Here’s how I did this video:

  1. I drew an image using a color I knew I wasn’t going to be using in the final image. For fun, I used non-photo blue (rgb: 164, 221, 237), which is one of the colours that artists use when sketching on paper because it practically disappears when the drawing is scanned in grayscale.
  2. I started the Camtasia recording and drew over my image using a different color.
  3. I edited the Camtasia recording, splitting the tracks and turning on Remove Color for some parts. I also added some text callouts.

Tada!

You can find the Remove Color option under Visual Properties (select More > Visual Properties if you don’t see it). Enjoy!

Capturing my sketchnotes with Camtasia Studio Pro; organizing the digital workflow

Posted: - Modified: | drawing

People often want to sit beside me to see how I’m drawing my sketchnotes, so I thought I’d record one session and put together a short video. Here’s how I drew yesterday’s sketchnote. In this video, I zoomed in so that you’re not distracted by all the other controls I have open. =)

Most of the sketchnote artists I know work on paper – sketchbooks, large sheets of paper, whatever. A few use iPads or Android tablets. Few people use tablet PCs, possibly because most designers like using Macs and Apple’s not keen on the tablet PC / stylus combination. I love how I can use my Lenovo X220 Tablet PC to sketchnote, and I want to share what I’ve been learning along the way.

Working on the computer, it’s easy to:

  • colour-match logos
  • paste in pictures and templates
  • draw over a light grid for alignment and spacing
  • move things around, erase things, resize things
  • draw without worrying about blurring or smudging
  • export to different resolutions
  • publish immediately after an event, which is great for following up and for catching the wave of interest on Twitter and blogs
  • capture my sketchnoting process and turn it into a speed-drawing video

I use Autodesk Sketchbook Pro. If I want to record my sketches while I’m doing them, I turn on Camtasia Studio as well. I used to use ArtRage for drawing and animation, and I’ve produced 1-minute animated sketchnotes using that, but it’s not as responsive and pen-friendly as Autodesk Sketchbook Pro is.

Working on a tablet PC is so different from working on paper or on a digitizing tablet like those small Wacom ones. On paper, you can use your peripheral vision to keep the big picture in mind as you’re working on some detail. With digital sketchnoting, I zoom in so that I can draw legible letters, so I don’t have that sense of space – but I can work at various zoom levels using very similar motions, so I can be more consistent. The ability to sketchnote an event in person without needing a special table or access to a power outlet allows me to put the spotlight on all sorts of events, while a digital workflow lets me publish things right away and spread the ideas even further.

Some organizational tips if you’re heading down this path as well:

Invest the time in developing your templates. I’ve been experimenting with different aspect ratios. Lately, I’ve been using a 7.5”x10” template at 300dpi, which means that I can print my sketchnotes on letter-sized paper, and they still look decent at 11×17”. I also have templates for a square grid and for credits so that I don’t spend time lining up my name, Twitter handle, and URL just so.

Save the colours and your favourite brushes to your palette. Make it easy to switch between colours by adding them to your palette. Experiment with the right brush widths too, and save those.

Pay attention to how you name your files and save your images. Exporting files with descriptive names saves me lots of time when it comes to filing and searching them afterwards. I sketchnoted more than a hundred 1-hour talks last year, and I often find myself using Evernote to dig up a specific sketch.

Lots of people tell me they’d love to learn how to do things like this. I want to help people improve their visual communication skills. What kinds of questions do you need answered? What would help you get started?