Tags: hacklab

RSS - Atom - Subscribe via email

Laser-cutting bias tape in off-cut regions
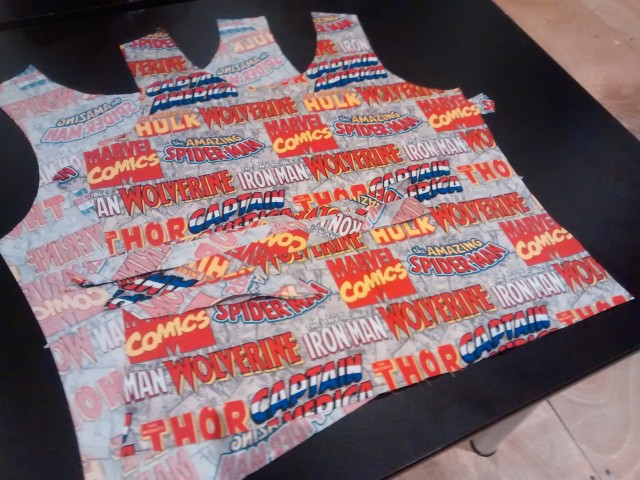
Posted: - Modified: | sewing

I have a few more tops to do. As an experiment, I cut my bias strips from the offcuts surrounding the peach top I was working on. That took a bit more work than cutting a 10″ square and following the continuous bias tape tutorial from Colette, but it was satisfying to use the oddly-shaped offcuts for something useful.

To make this easier in the future, I modified my basic top laser-cutting template to include bias strips (and a few other circles and 2″ rectangles) in the off-cuts. I’ll be able to use it for the Kaufman cotton lawn that I haven’t started working on yet, and I’m looking forward to giving this tweaked pattern a try.

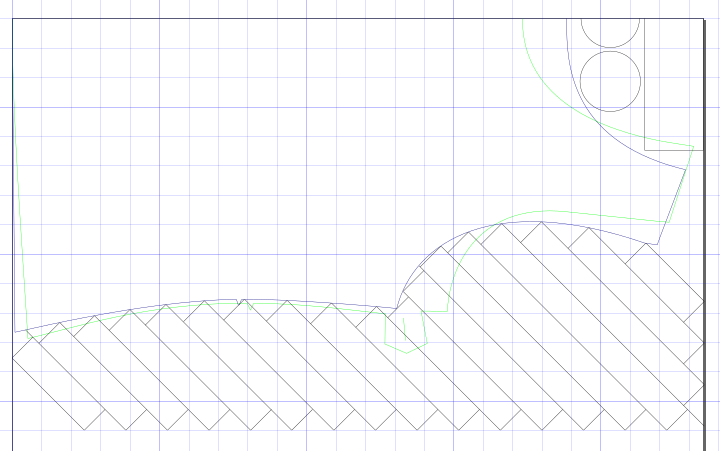
This is what it looks like in Inkscape:

2015-05-08 22_40_17-2015-05-08-top.svg - Inkscape.png 2015-05-08 22_40_17-2015-05-08-top.svg - Inkscape

The perpendicular seams waste a little more fabric and are a little bulkier compared to 45-degree seams, like this:

2015-05-08 22_03_29-2015-05-07-top.svg - Inkscape.png2015-05-08 22_03_29-2015-05-07-top.svg - Inkscape

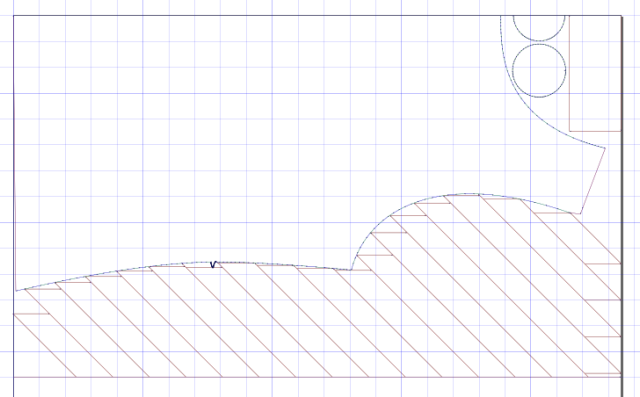
but I find perpendicular seams easier to sew, since I don’t have to worry about the pointy ends getting misaligned.

How to draw the diagonal lines:

  1. Use the pen tool to draw a long diagonal line, using the Ctrl key to constrain it to a 45-degree angle.
  2. Use Ctrl-D to duplicate it many times.
  3. Select all the duplicates.
  4. Use Object > Arrange to arrange the lines in one row (uncheck the checkbox for equal width and height). For 1″ bias strips, set the X offset to 1.414 – the diagonal line’s width. This will be a negative number. Set the Y offset to 0. Arrange the items.
  5. Combine the arranged lines and move them into position.
  6. Duplicate your main pattern with Ctrl-D.
  7. Select that and the combined diagonal lines. Use Path > Cut Path to cut the diagonal lines where they intersect with your main pattern.
  8. Delete the lines you don’t need.

Here’s one way to draw the horizontal or perpendicular lines in Inkscape:

  1. Use the pen tool to draw a line at the desired degree, using the Ctrl key to constrain the angle.
  2. Change the width (and height, for diagonal ones) in the toolbar to make it exactly fit between the lines.
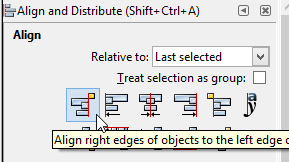
  3. Select the seam line, then select a diagonal line. Use the alignment tools to align it to the top of the diagonal line and align the right edge to the left edge of the diagonal line. (Play around with the alignment tools until you figure out what works.)

2015-05-08 22_47_36-2015-05-08-top.svg - Inkscape2015-05-08 22_47_36-2015-05-08-top.svg - Inkscape.png

Now I just have to figure out what to do with these bias tape bits that are piling up. This patchwork string tutorial looks promising. In addition to using the bias tape for binding, I can use them for straps, strings, and ribbons. Hmm…

Here’s the file: https://github.com/sachac/laser/blob/master/2015-05-08-top.svg

Laser cutting update: Marvel version

Posted: - Modified: | geek, sewing

I cut the Marvel-licensed fabric that I picked up from Affordable Textiles on Queen Street (near Spadina) on the laser cutter. It worked out beautifully. I reused the SVG I tweaked after last week's experiments. As it turns out, even with a 45" one-way design, 1.5 yards is enough for a top, enough bias strips to bind the neckline and armholes, and two pairs of liner squares. There will be small scraps that I can use for other projects, too.

2015-04-14 21.52.43

This will be my 12th top, and I have the fabric for a 13th if I wanted to. I'm currently wearing the top that I laser-cut out of 100% Italian cotton. 100% cotton seems much more comfortably breathable than the polyester-cotton blend in the broadcloth that I practised with. Maybe I'll do a few more tops as I come across colours and patterns that I like, and I'll also gradually branch out to other patterns as well.

A checklist of things to try, fabric-wise:

  • Cotton
    • Fabric ordered online – maybe this cute Dr. Seuss fabric or something else from Jo-Ann (or maybe this one), to remind me to have fun
    • Something from Etsy
    • Fabric using someone else's design, maybe off Spoonflower
    • Fabric I design
  • Stretch knit
  • Silk or other slippery fabrics

Mwahahaha. =)

2015-04-14d Laser-cutting fabric is awesome -- index card #laser #hacklab

2015-04-14d Laser-cutting fabric is awesome – index card #laser #hacklab

View or add comments (Disqus), or e-mail me at sacha@sachachua.com

Laser cutting registration experiments and cutting long pieces of fabric

| geek

(aka Things Other People Probably Already Knew About the Hacklab Laser Cutter But That I Wanted to Figure Out =) )

For sewing purposes, I want to eventually be able to accurately cut pieces that are larger than the laser bed (22×18″). The approach that other people had recommended for large cuts is to laser-cut a piece of paper, then position material on top of it. This works really well for acrylic and other clear materials, but it’s a bit trickier with fabric.

I was curious about the following questions:

  1. Do the cutting bounds coincide with the mat if the grid has been removed? If so, then placing material would be much easier.
  2. Can you use registration markers to make the process of shifting opaque material easier?
  3. Can you build pauses into laser programs to make it easier to reposition material or adjust power?
  4. Do you need to keep stroke width in mind when setting the X and Y locations for paths in Inkscape? That is, when you set the X and Y, does it use the path (which is what’s used for cutting), or does it use the stroke width?
  5. Is the lowest leftmost position stable? That is, if you rehome the laser and then use the joystick to move it to the minimum X and Y the hardware will let it reach, does that position stay the same even if you repeat the process?

To explore these questions, I created an SVG that had

Since Inkscape’s Gcode tools export the path names, I used Path – Combine to group related paths and the Object Properties dialog to rename them. This allowed me to edit the resulting Gcode, move the path for the second half-circle to the end of the file, and add an M0 pause before it. I taped paper down to cover the four corners. After processing the file with the sed scripts used to tweak things for our laser, I ran it.

Here are the results:

1. The cutting area does not coincide with the rulers or the mat.

I homed the laser and then touched off at the minimum X and Y positions that the hardware would let me reach. The lines I cut for the upper corners are slightly skewed away from the built-in ruler, which means that it cannot be used for alignment.

2. Registration marks allow for reasonable precision in large cuts.

2015-04-06 12.40.222015-04-06 12.36.01

The circle above is formed from half-circles, cut in two passes separated by a reposition. I started with two sheets of paper taped to the lower left corner: one to move, and one to act as a reference. After I made the first cut, I repositioned the top layer of paper so that the crosshair on the right was on top of the crosshair on the left and the reference line I cut was aligned with the lower left corner. Folding the quarters of the crosshair back helped me verify its position. I taped the top layer of the paper down and proceeded with the second cut. This simple registration process produced a cut that’s not completely accurate, but which is manageable for the kind of work that I want to do. It could probably be refined with additional crosshairs, boxes, or other registration shapes.

(Update: Boxes work wonderfully.)

3. You can use the M65 P0 and M0 operations to add a pause to your G-code program, but the program will be reset if you raise the lid of the laser.

The M0 operation pauses the program, and you can continue it by clicking on the pause button in the controller. However, when you raise the lid of the laser to reposition material, the controller loses the connection to the laser. After you reestablish the connection, the controller is no longer in pause mode, and you need to start the program from the beginning.

Because my G-code was relatively simple, I chose to re-run the program with zero power. When I reached the pause, I set the power to level 1 and continued with the program. This may be a good way to handle larger cuts if you want to keep the design in a single G-code file. Here’s a snippet showing the pause code.

M63 P0

(End cutting path id: upperleft)

M65 P0
M0

(Start cutting path id: secondhalfcircle)
(Change tool to Default tool)

M63 P0

M65 P0 turns off the laser immediately (instead of being synchronized with motion), and M0 pauses the program until it’s continued from the controller.

If you don’t want to pause and rerun, you can always split your cuts into separate G-code files. Dividing your SVG into layers makes it easy to select all the paths on a given layer before running the G-code export tool.

4. Inkscape takes stroke width into account when you move paths using X and Y, so be consistent about your positions.

If your stroke width is 1 px, then a line drawn on top of a 1″ grid from (0,0) to (0,2) will start at (-0.006″, -0.006″) and have a height of 2.006 inches. This can still be cut. If you move it to (0,0), the actual line itself will be offset by a tiny bit, although I’m not sure how much difference it would make when cutting. Anyway, when creating registration marks, make sure you have a consistent offset between your registration marks and the path to cut, and that you use a consistent stroke width (even if the laser cutter ignores that width). Make sure you turn off the default preference that scales stroke widths whenever you resize something (Edit – Preference – Behavior – Transforms – Scale stroke width, or use the fourth icon from the right of the top toolbar).

5. The lowest leftmost position appears to be stable.

If you home the laser, then use the joystick to move to the minimum X and Y position you can reach in the lower left, and you use the GUI controller to touch off at that point so that all coordinates are relative to that position, then your cuts will be in the same place each time. This appears to be true even after you rehome the laser and re-touch-off, and even after you turn off the laser and restart Linux EMC2. This means we could probably mark off the outside limits of the cutting area on the mat using something that’s laser-safe, and then people could use those as reference lines. On the temporary side, there’s taping down paper and using that as a guideline, which people are used to already.

Whee! So with the results above, I should now be able to make decently-precise long cuts in fabric…

2015-04-06 15.10.27 2015-04-06 15.09.58

MWAHAHA. Behold the power of the laser cutter. The pattern pieces are about 23″. This is the picture of a cut after the piece has been shifted so that the registration squares on the right of the fabric is over the registration squares on the left on my reference piece of paper. There’s a barely-perceptible jog in the line, and since that’s in the seam allowance instead of in a design, it’s totally okay.

All right! See files at https://github.com/sachac/laser if you want to explore.

Accurately tracing and cutting patterns makes the rest of sewing so much easier because you can go by the seam allowances. Since long cuts on fabric turn out to be Not That Scary, I can use this for cutting the pieces to sew together. For fabric that is harder to handle or laser-cut, I can use the laser to cut pieces that I can then pin to the real fabric for hand-cutting (since fabric patterns can be easier to handle than paper). Mwahaha!

View or add comments (Disqus), or e-mail me at sacha@sachachua.com

Cupcake challenge: accepted!

Posted: - Modified: | cooking

CameraZOOM-20141024194729408

For the Hacklab grand re-opening party, I made 58 vegan chocolate cupcakes using about four batches of this Basic Vegan Chocolate Cupcake. Each batch called for:

mixed and baked in a 350F oven for 18-20 minutes (20 minutes at Hacklab). Once cooled, we decorated them with this Vegan Fluffy Buttercream Frosting, which called for:

Fortunately, Eric had donated an electric mixer (hand), so whipping up the frosting was easy. The cupcakes were not too sweet, so the frosting was a nice balance.

I also made 12 non-chocolate, non-vegan, gluten-free cupcakes from a boxed mix, since some Hacklab members have those dietary restrictions. Eric iced those with a different recipe.

It was actually pretty fun making dozens of cupcakes. Because they're in liners, it's easy to make large batches of them and set them cooling on whatever surfaces are handy. I started at 4ish and spent the whole afternoon cooking. I also had fun using the simple cake decoration kit to pipe letters and icing on it, although my hands were a smidge shaky. I actually forgot to add the soy milk and extract the first time around, but I caught it after icing the first ten cupcakes with something that was mostly sugar. After I beat in the soy milk, icing was a lot easier.

We don't really make a lot of desserts at home because we'd like to eat more healthily, but since J-‘s friends are often over, maybe I should look into making more snacks to keep around the house. Probably not chocolate cupcakes – maybe something healthier? – but it's definitely baking season, so some kind of baked good. Then again, W- reminds me that a box of cookies on sale is pretty cheap, so we might as well use the time for other things.

I don't quite remember making cupcakes before the party. Maybe I've made cupcakes before, but just forgot about it? Anyway, they're not intimidating after all. =) And with vegan recipes, I can taste the batter a little to see if I'm on the right track!

View or add comments (Disqus), or e-mail me at sacha@sachachua.com

Thinking about how to make the most of the new Hacklab

Posted: - Modified: | geek

The new Hacklab (1266 Queen Street West) will have wood-working tools, a skylight, and more space to set things up (maybe the sewing machine and serger?). There's a big fabric store nearby, too. In addition to those new capabilities, all the usual tools will probably be easier to use: the laser cutter, the 3D printer, the CNC mill, the electronics equipment…

With that in mind, what would I like to learn more about so that I can make the most of Hacklab? I've mostly been treating Hacklab as a place to meet people, with the vegetarian cooking practice and social link building as bonuses. There's a lot more I could do with it, though, and it might be good to explore.

I'd love to become proficient in making things that fit our life. I like how Norm made custom workbenches and corner tables from lumber. I like how people 3D-print handles and adapters for various things, and how they laser-cut cases, stencils, and jigs. I'm not entirely sure how I'm going to handle transporting lumber and finished goods (bicycle? cab? asking W- for a ride?), but maybe I can learn how to draw up plans, verify those plans with people who have more experience, and work on things at home (since we have many of the tools anyway). So maybe I won't be making as much use of the tools, but I can practise asking for help.

Although it would be pretty nice to make a better case for my Samsung Galaxy S3 with the Hyperion extended battery I have…

It might be good to use the skylight to start some plants during the winter, too. I'll need to order seeds for that one, I think.

I could also work on web or Android stuff while I'm there, since those are the sorts of things that other people work on. I could work on writing too, but that's a little harder because of the background conversations.

So a weekly or bi-weekly trip to Hacklab could be a commitment device for making regular progress on a physical project (wood, sewing, or electronic), a programming project, and vegan cooking adventures. Would that be worth the ~$6 transit fare (+ about 1.5 hours of travel) to get there in winter? Hmm. Probably. If I pre-commit the transit fare so that I don't have to make lots of little decisions, carving out a part for it from my budget for the year… It makes sense to push myself to go there, since if I stay home, I'm less likely to work on those kinds of things.

We'll see how this works out!

View or add comments (Disqus), or e-mail me at sacha@sachachua.com

Hacklab open houses and connecting through cooking

Posted: - Modified: | connecting

I joined Hacklab (a small makerspace here in Toronto) early in 2013. I thought of it mostly as a way to meet people who are working on interesting projects, hang out, and learn together. It's been working out well, and I'm gradually getting into helping the community more.

Hacklab hosts an open house every Tuesday evening. It's a good opportunity for prospective members to check out the place and chat with people about their projects. We usually put together a vegan dinner donated by the person cooking it so that it's free for the members and guests (although sometimes people pitch in for groceries). There's no fixed schedule; people just volunteer to cook whenever they want. When I'm there, I often volunteer. I treat it as a vegan cooking lesson / soup kitchen / party. Sure, I'm teaching myself, but it's still an excuse to try new recipes. I think the people there are worth supporting, and cooking is a much more efficient use of money than having people go out to dinner. Besides, other people often help with preparing the ingredients, and we can chat while doing so.

Here are some easy dishes that we can make with ingredients from nearby grocery stories:

I think I'll make recipe cards with serving numbers and cost estimates. That will probably make it easier to come up with dinners on the fly, and it might encourage other people to cook too.

We've been slowly improving the Hacklab kitchen. The addition of pots, a rice cooker, and lots of cutlery helped a lot. (It was difficult to cook and serve before those things!) Last week, I replaced the rather ineffective and hadn't-been-washed-in-ages kitchen towels with two sets I'd made from some fabric we had at home. I'll add the towels to our weekly laundry cycle, so things actually get washed. Storage is still an issue. The fridge is used mostly for drinks, so we try to not have any left-over ingredients or servings.

I'm not currently working on super-geeky projects that involve other members or the equipment that's there. (It would be interesting to do more with the laser cutter, 3D printers, or the new mill!) But cooking gives me a way to help other people, so that's something.

I think I like this approach of taking responsibility for making Hacklab a little bit better for people. You get as much out of a community as you put in, and these little domestic touches can help make a place feel more like home. (I'm going to keep nudging people to put their dishes in the dishwasher, though! ;) )

So why does this feel easy compared to, say, having people over for a party or potluck at home? The kitchen at home is better-equipped, and both groceries and left-overs are easier to deal with. Maybe it's because I can decide whether or not to go to Hacklab on the day itself. I can leave whenever I want, too. There are usually lots of people at Hacklab and they're good at keeping themselves occupied or talking to each other, so I don't have to worry about any awkward moments or entertaining just one person. There are lots of things going on in the area, so people can always step out for a different meal or take a breather in case there aren't any seats or in case things are overwhelming. Hmm, maybe if I invite people to catch up at these open houses instead of waiting until I work up to having parties at home… Not everyone all at once, maybe one or two invitations at a time. Hacklab's a bit loud, but we could always go for a walk if needed. That might work. Who knows? They might meet interesting people there too.

View or add comments (Disqus), or e-mail me at sacha@sachachua.com

Decision review: Seven months at HackLab

Posted: - Modified: | connecting, decision, review

HackLab logo

It’s been a little over half a year since I signed up for a membership at HackLab, a makerspace and coworking area in Kensington Market. Before I signed up, I thought about the things I would like to be true at the evaluation point for my experiment, which I set at nine months after I signed up (so November 2013). I figured it would be good to do a quick check so that I can adjust things. Here’s what I wrote in February, and how it has matched up so far with my experience:

I know more about other geeks in Toronto thanks to ambient conversations and helping each other out
HackLab is full of interesting people. I like dropping by and hanging out at the open houses or during regular days.
I’m better at asking people for help when I get stuck, and at setting myself tougher challenges knowing that people can help
I’ve done this a couple of times (keyboard layouts, business questions, web stuff, system administration), although I still need to work on that.
I’ve dug into some of the more difficult things that are easier to learn with other people who can help me. For example: web development, mobile development, electronics
Web development and system administration might be good things to focus on. There are lots of other people who are working on similar things.
I’ve gotten better at sketching ideas, asking other people for feedback, and fleshing out the ones that get people interested
I drew How to Learn Emacs while I was at HackLab. That was fun. =) I’ve drawn some of the sketchnote lessons here, too.
I’ve improved serendipity (test different laptop cues to talk? talk to people about what they’re working on?)
Overhearing stuff works well.
I go to HackLab 1-2 times a week, and sometimes more often if the weather is great.
See analysis below
I’m good at managing my focus (do not disturb / yes, talk to me)
Background conversations interfere with things like typing practice (Plover/Colemak), but I’m okay with listening to conversations while typing (Dvorak), coding, or drawing. Headphones help a little.
I’m good at talking to new people and hanging out with the regulars
Getting there. I feel comfortable around HackLab members and I often have interesting conversations at open houses, particularly over food.

In general, the benefits I’m looking for are:

My initial goal was to go to HackLab 1-2 times a week. As of 2013-09-25 (~31 weeks after I joined; I was doing this analysis before the members’ meeting), I have been to HackLab on 41 distinct days. This is within my target range of 31 to 62 visits, and works out to 1.3 visits a week. This is a pleasant surprise, because I started this analysis thinking that I was underusing my HackLab membership compared to my goals. Based on my current attendance, this costs a little less than $10 per visit, which is worth the awesome vegan cooking opportunities / lessons / dinners (Tuesday open houses) and overheard conversations with interesting geeks.

I’m at 66% of the top part of my goal range. What are my current limiting factors, and how can I work around them?

Inertia is powerful and works ways: when I’m home, it’s easy to stay home; when I’m in the middle of working on something interesting on the kitchen table, I don’t want to pack up and bike over. I often sleep in during my non-consulting days, and sometimes I think: “Is it really worth biking downtown for a few hours of hanging out or working?” I’ve also offered to do a couple of extra half-days of consulting each week during September and October, so that limits the number of days when it makes sense to go to HackLab. Besides, introvert mode is pretty comfortable – no distracting conversations, and plenty of good food in the fridge.

So, what could help me make even better use of HackLab? How can I hack my motivation and reward structure to get me out the door?

What about winter? I’m going to face some motivation challenges when snow makes biking more dangerous and the cold encourages me to stay home. On mild days in winter, I might be able to bike down or TTC down. I can use that as a context switch to write or code. Is it worth $6 to take the TTC down here at least once a week, bringing it to a total cost of $16 or so? Maybe, especially if I move things around so that I’m at HackLab instead of consulting on Tuesdays (or I work remotely on Tuesdays). If I discount winter and consider my membership based solely on my attendance so far, it works out to roughly $15 per day, which is still worth it considering other co-working spaces are $20 for a day pass and don’t offer 24h access, not that I’ve been here at 3 AM. Besides, HackLab does cool things. So yes, I’ll continue throughout winter, and I’ll see if I can get past the activation costs of getting down here by TTC. (Reading time on the subway/streetcar, and travelling during off-peak hours?)

Incidentally, here are the queries that I used to check how many times I’ve been in HackLab:

SELECT COUNT(DISTINCT(DATE_FORMAT(logged, '%Y-%m-%d'))) from access_log where card_id='123-3149';
SELECT MIN(logged) FROM access_log WHERE card_id='123-3149';

Let’s see how this goes!

View or add comments (Disqus), or e-mail me at sacha@sachachua.com