Labeling toy storage bins with photos and text using ImageMagick and org-babel
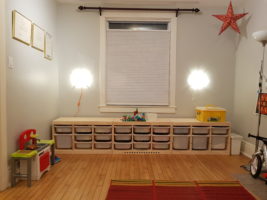
| emacs, geek, org, organization, parenting, play I wanted to make labels for A-‘s new toy storage: three low Trofast drawer frames all along the wall.
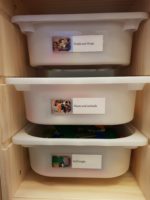
I liked how early childhood drop-in centres labeled their shelves with both pictures and text. That way, kids can find things before she can read, while still being exposed to print. I took pictures of the bin contents and renamed the files to the labels I wanted to put on them, such as 2x2 blocks.jpg. (We have a lot of Duplo.)
This time, I experimented with creating the labels entirely in Imagemagick instead of using LaTeX. First, I used a table in Org Mode to let me easily play with the dimensions and recalculate pixel sizes.
| DPI | 300 | |
| Columns | 3 | |
| Rows | 5 | |
| Paper width | 14 | 4200 |
| Paper height | 8.5 | 2550 |
| Minimum margins | 0.5 | 150 |
| Label width | 4.3333333 | 1300 |
| Label length | 1.5 | 450 |
I passed the width and the height to the following code block by using header arguments. I liked using 400 pixels as the height instead of 450, so that's what I used. My source image size was 4032×3024 pixels. If I resize them to a height of 400, that gives me a width of 533. Allowing 20 pixels for the text left and right borders gives me (- 1300 533 20 20) = 727 as the text width.
#+begin_src sh :dir ~/code/labels :var width=1300 :var textwidth=727 :var height=400 :var pointsize=72 :results silent
for x in source/*; do
  file=$(basename "$x")
  /usr/local/bin/convert \( \( "source/$file" -resize x${height} \) \
     \( -background white -fill black -font Alegreya-Regular -bordercolor White \
         -gravity West -border 20 -pointsize $pointsize -size ${textwidth}x caption:"${file%.*}" \) \
     +append \) \
     -extent ${width}x${height} \
     \( -fill none -stroke gray -draw "rectangle 0 0 $(echo $width - 1 | bc) $(echo $height - 1 | bc)" \) \
     "out/$file.png"
done
#+end_src
Sample resized label:
I moved the ones I wanted from the out directory to a ready directory and combined the ones I wanted to print into a PDF:
#+begin_src sh :dir ~/code/labels :results silent
montage ready/*.png -tile 3x5 -background none -geometry +0+0 print.png
convert print*.png -density 300 -quality 100 print.pdf
#+end_src
 Then I printed the labels in colour on an 8.5×14″ sheet of paper (single-sided, landscape), cut them out, and taped them onto the bins with packing tape.
W- suggested taking macro shots that more clearly show the characteristics of things in the bins instead of just aiming down and taking pictures of the contents. Might be a good excuse to show A- basic product photography when we get back.
W- also recommended making the label text bigger. The first time I did it, I just picked a pointsize based on whatever fit the ones I wanted to print. I decided against letting Imagemagick maximize the font size because I didn't want labels to have very different text sizes. After a little poking around, I figured out how to use caption: instead of label: to give me text that can neatly wrap within a given space, and that will probably let me use 90-point font instead of 72-point font. That will make the next iteration of labels even easier to read.
It's nice having all these bins. A- is getting pretty good at heading straight for the bin she wants something from, and she even talks about them: “Horse is in animals bin.” I'm glad we labeled the most frequently used bins. I'll tweak the labels when we get back from our trip. We'll probably change some of the bin contents anyway.
Hooray for ImageMagick, and hooray for variables in org-babel blocks!


4 comments
Erik Pischel
2018-03-26T10:26:28ZHaha, good luck sorting all the lego bricks back into the correct bins :-) At least when you have a certain amount of them.
Color sorting is easier. But what to do with all these tiny bits? An unsolved problem. I dream of an automated approach.
sachac
2018-03-26T12:02:09ZSorting Duplo by function is pretty easy at the moment, since I can just keep tidying up in the background and A- hasn't figured out how to dump containers yet. :) W- has a large LEGO collection all sorted by function for when she's older, too. With any luck, getting her used to organization early will help. We'll just have to see!
Christopher Wellons
2018-03-26T14:19:53ZBourne shell can evaluate simple integer expressions with $((...)) so no need for bc. For example: $((height - 1)).
sachac
2018-03-29T15:35:36ZI had some floating points at one time, I think, when I was experimenting with different heights, which is how bc ended up in there. :) But yeah, integers are easier!