How I animate sketches with Autodesk Sketchbook Pro and Camtasia Studio
Posted: - Modified: | drawing, process, videoSpoken words can be much more effective when accompanied with animation, so my clients have been asking me to put together short animations for them. Here's my workflow in case you're interested in doing this too.
Step 1: Draw the images and get them approved.
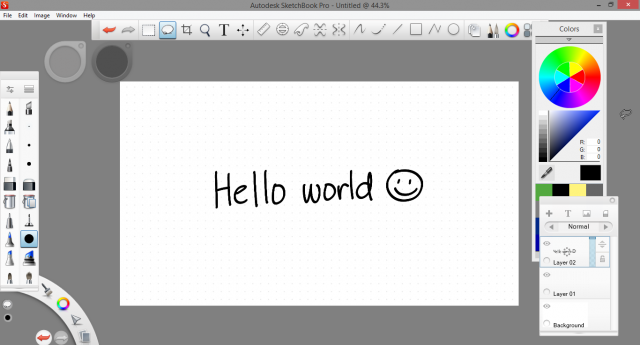
Make your canvas roughly the same size as your final image so that you can save frames if needed. The bottom layer should be your background colour (ex: white). You can use a grid to line things up, then hide the grid when you're ready to export. Use one layer per scene in your animation.
Step 2: Prepare for animation.
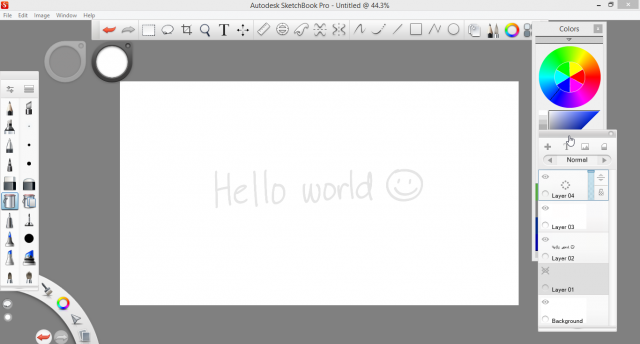
Hide everything but the first scene and your background layer. Add a white layer at 90% opacity above your sketch. This allows you to trace over your sketch while making it easy to remove the pre-sketch in Camtasia Studio. Using a translucent white layer allows you to fade your other scenes without adjusting the opacity for each of them.
Step 3: Lay out your screen.
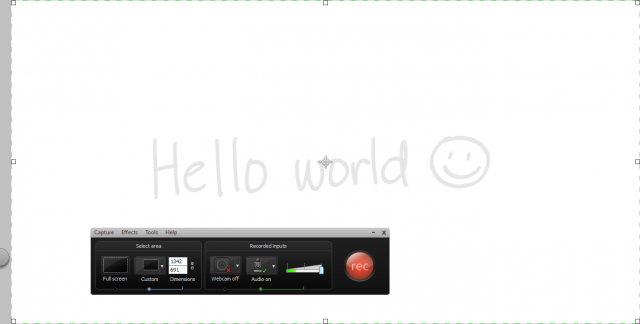
Zoom in as close to 100% as possible. Use TAB to hide the Autodesk Sketchbook interface and position your sketch so that the important parts are not obscured by the little lagoon controller on the left side. You can turn the title bar off, too. Set Camtasia Recorder to record your screen without that little controller – you can either record only part of your screen, or add a white callout afterwards.
If you need to create HD video, a high-resolution monitor will give you the space you need. My Cintiq 12WX has a resolution of 1280×800, and my laptop has a resolution of 1366×768. When I need to record at 1920×1080, I use my Cintiq as a graphics tablet for an external monitor instead.
It's probably a good idea to turn audio off so that you don't have to split it out and remove it later.
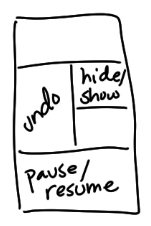
This is also a good time to set up convenient keyboard shortcuts or buttons. The Cintiq 12WX has some programmable buttons, so here's how I set mine up:
- Left button: Ctrl-z – handy for quickly undoing things instead of flipping over to the eraser.
- Middle right button: TAB – hides and shows the interface.
- Bottom button: Ctrl-Shift-F8 – the keyboard shortcut I set up my Camtasia Studio with, so I can pause and resume recording.
This makes it easier for me to pause (bottom), show the interface (middle right), change colours or brushes, hide the interface (middle right), and resume (bottom). That reduces the editing I need to do afterwards.
Step 4: Record!
Because the pre-sketch shows you where things should go and you've already fiddled with the layout to make sure things fit, it's easy to draw quickly and confidently. Use TAB to hide or show the interface. When you're starting out, you may find it easier to record in one go and then edit out the segments when you're switching brushes or colours. As you become more comfortable with switching back and forth between full-screen drawing and using the Autodesk Sketchbook Pro interface, try the workflow that involves pausing the screen, showing the interface, hiding the interface, and then resuming the recording.
Step 5: Edit and synchronize in Camtasia Studio.
Save and edit the video. Set it to the recording dimensions of your final output, and set the background colour to white.
Use Visual Effects > Remove a Color to remove the pre-sketch. Now it looks like you're drawing on a blank canvas. See my previous notes for a demo.
Now synchronize the video with the audio. You may want to add markers to your audio so that you can easily tell where the significant points are. Use the timeline to find out the duration between markers. Split your video at the appropriate points by selecting the video and typing s. Use clip speed (right-click on the segment) to adjust the speed until the video duration matches what you need.
Note that at high clip speeds, Camtasia drops a lot of frames. If this bothers you, you can render the sketch at 400% speed using Camtasia or Movie Maker, produce that as an AVI or MP4, re-import that media, and continue compressing it at a maximum of 400% speed each time until you get the speed you want.
If you need to cover up a mistake, a simple white rectangular callout can hide that effectively. If you need to make something longer, extend the frame. Because you can't extend frames into video that's already there, you may want to drag the segment onto a different track, and then split or cut the excess.
Produce the synchronized video in your required output format (ex: MP4, MOV…) and you're done!
Hope this workflow helps you get into doing more animated sketches with Autodesk Sketchbook Pro and Camtasia Studio on a laptop or desktop computer. Do you use other tools or other workflows? Please share!


