Categories: process

RSS - Atom - Subscribe via email

Describing my personal knowledge management routines with Harold Jarche's Seek-Sense-Share framework

Posted: - Modified: | pkm, learning, podcast, process, sharing

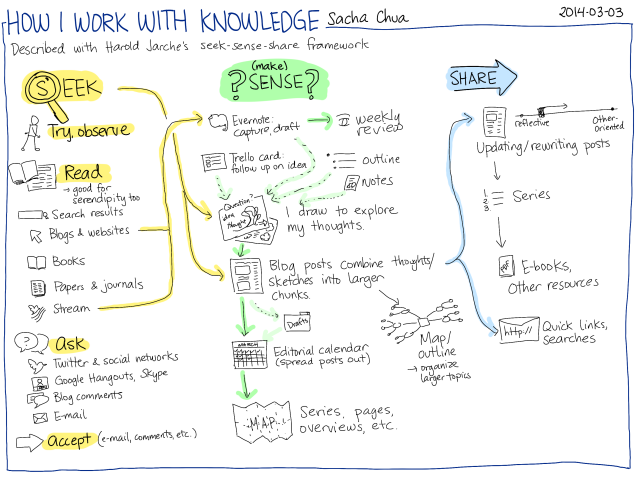
I spend much of my time learning, making sense of things, and sharing what I've learned. I like connecting with other people who think about how they do this. I chatted with Harold Jarche about how he manages his 10-year blog archive. We thought it might be good to describe our knowledge management processes in more detail. Here are more details on mine!

2014-03-03 How I work with knowledge - seek, sense, share #pkm

2014-03-03 How I work with knowledge – seek, sense, share #pkm

Seek

One of the things I'm working on as part of this 5-year experiment is to be more proactive about learning. It's easy to fall into relying on client requests or a serendipitous stream of updates to teach me interesting things. It takes more work to observe what's going on and come up with my own questions, ideas, and experiments. I think learning how to do that will be more interesting.

I used to get most of my information through reading. I love being able to slurp a book and take advantage of someone else's experience. I turn to the Web for more current or on-the-ground information. I read social network updates and blog posts to find out about things I didn't even think of searching for.

I'm learning more about asking people. There's a lot written down, but there's also a lot of knowledge still stuck in people's heads. Asking helps me pull that out into a form other people can learn from.

Trying things myself helps me test knowledge to see if it makes sense to my life. I learn how to adapt things, too, and I might even come up with my own ideas along the way.

Sometimes I get interesting questions through e-mail, comments, or other requests. Those are worth exploring too, since explaining helps me understand something better. I fill in gaps in my understanding, too.

(Make) Sense

Many of my blog posts are reflective. I think out loud because that helps me test whether I make sense. Sometimes other people help me learn or think my way through complex topics. A public archive is helpful, too. I can search my thoughts, and I'm relatively confident that things will continue to be around.

Chunking

The main challenge I'm working on is getting better at “chunking” ideas so that I can think bigger thoughts. I'm comfortable writing my way through small questions: one question, one blog post. As I accumulate these posts, I can build more complex thoughts by linking to previous ones.

Sketches help me chunk ideas. Like blog posts, each sketch addresses one idea. I can combine many sketches into one blog post, and then use a sketch to map out the relationships between ideas.

I'm learning how to organize my posts into series. A better writer would plan ahead. Me, I usually work backwards instead, organizing existing posts and tweaking them to flow better. When I get the hang of series, I'll be able to start thinking in chunks of short books.

Reviews

I have a regular review process. I do weekly reviews of my blog posts, sketches, reading, and time. I do monthly reviews and yearly reviews, rolling the summaries upward.

I've written some scripts to simplify this process. For example, I read blog posts with the Feedly reader. If This Then That imports my Feedly saved items into Evernote. I have an Emacs Lisp function that reads Evernote exports and formats them for my blog, and then I annotate that list with my thoughts.

Archive hacks

Even with this review process, I can't remember everything I have in my archive. Fortunately, I'm a geek. I like building and tweaking tools. I've written about the different things I do to make it easier to go through my archive. I can find things faster thanks to little things like having a browser search keyword for my blog. Recommendations for similar posts help me find connections that I might not have thought about myself.

Delegation

One of the unusual things I've been experimenting with is delegation to a team of virtual assistants. I ask people to research information, summarize what they find, and draft posts. I can find things faster myself, and I can write pretty quickly. Still, it's a useful way to learn about things from other people's perspectives, and I hope it pays off.

Share

My website is the base for all my sharing. Having seen so many services come and go, I don't trust anything I can't back up and control. I keep most things in a self-hosted WordPress blog. I also use Google Drive for easy, granular sharing (such as my delegation process folder), and Dropbox for other features.

I keep a copy of my sketchnotes in Evernote for convenience, and I share those notebooks as well. See my sketchnotes, sketchbook, and visual vocabulary.

Google Hangout on Air is great for recording podcasts and video conversations. The broadcast is available as a live stream, and it's automatically recorded too. I've been moving more of my conversations to Hangouts on Air so that other people can learn from them.

I don't want to clutter my main Twitter account with automated posts. I use @sachac_blog for blog post announcements. On occasion, I'll post links or sneak previews with my main Twitter account, @sachac.

For free/pay-what-you-want resources, I use Gumroad. I like the way that it lets me offer digital resources while giving people a way to show their appreciation.

I'm also experimenting with paper books using CreateSpace. I'm looking forward to releasing some sketchnote collections through that.

How about you? How do you work with what you know?

Check out Harold Jarche's post, too: What is your PKM routine?. Want to watch our conversation about large blog archives? See Youtube video below.

How I animate sketches with Autodesk Sketchbook Pro and Camtasia Studio

Posted: - Modified: | drawing, process, video

Spoken words can be much more effective when accompanied with animation, so my clients have been asking me to put together short animations for them. Here's my workflow in case you're interested in doing this too.

Step 1: Draw the images and get them approved.

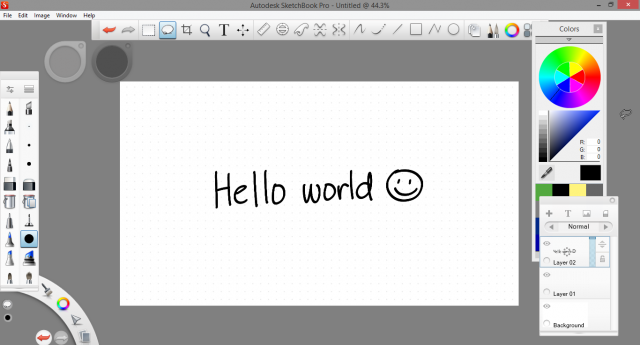
Make your canvas roughly the same size as your final image so that you can save frames if needed. The bottom layer should be your background colour (ex: white). You can use a grid to line things up, then hide the grid when you're ready to export. Use one layer per scene in your animation.

Step 1: Draw the image - get it approved if necessary

Draw the image – get it approved if necessary

Step 2: Prepare for animation.

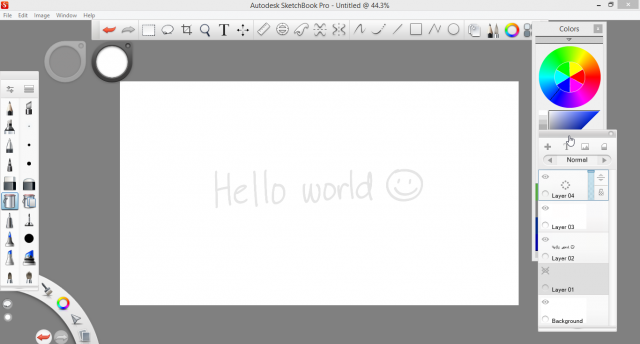
Hide everything but the first scene and your background layer. Add a white layer at 90% opacity above your sketch. This allows you to trace over your sketch while making it easy to remove the pre-sketch in Camtasia Studio. Using a translucent white layer allows you to fade your other scenes without adjusting the opacity for each of them.

Step 2: Prepare for animation

Prepare for animation

Step 3: Lay out your screen.

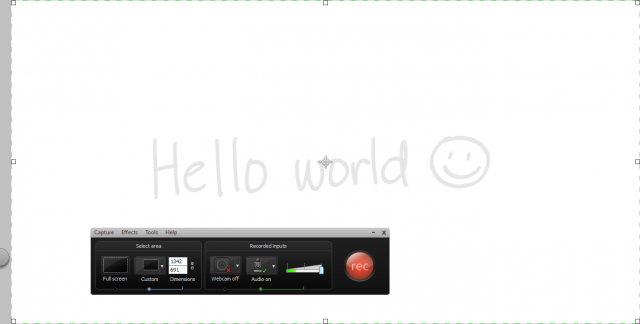
Zoom in as close to 100% as possible. Use TAB to hide the Autodesk Sketchbook interface and position your sketch so that the important parts are not obscured by the little lagoon controller on the left side. You can turn the title bar off, too. Set Camtasia Recorder to record your screen without that little controller – you can either record only part of your screen, or add a white callout afterwards.

Lay out your screen

Lay out your screen

If you need to create HD video, a high-resolution monitor will give you the space you need. My Cintiq 12WX has a resolution of 1280×800, and my laptop has a resolution of 1366×768. When I need to record at 1920×1080, I use my Cintiq as a graphics tablet for an external monitor instead.

It's probably a good idea to turn audio off so that you don't have to split it out and remove it later.

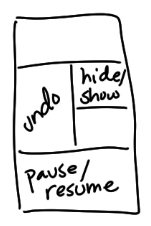
Cintiq buttons

Cintiq buttons

This is also a good time to set up convenient keyboard shortcuts or buttons. The Cintiq 12WX has some programmable buttons, so here's how I set mine up:

  • Left button: Ctrl-z – handy for quickly undoing things instead of flipping over to the eraser.
  • Middle right button: TAB – hides and shows the interface.
  • Bottom button: Ctrl-Shift-F8 – the keyboard shortcut I set up my Camtasia Studio with, so I can pause and resume recording.

This makes it easier for me to pause (bottom), show the interface (middle right), change colours or brushes, hide the interface (middle right), and resume (bottom). That reduces the editing I need to do afterwards.

Step 4: Record!

Because the pre-sketch shows you where things should go and you've already fiddled with the layout to make sure things fit, it's easy to draw quickly and confidently. Use TAB to hide or show the interface. When you're starting out, you may find it easier to record in one go and then edit out the segments when you're switching brushes or colours. As you become more comfortable with switching back and forth between full-screen drawing and using the Autodesk Sketchbook Pro interface, try the workflow that involves pausing the screen, showing the interface, hiding the interface, and then resuming the recording.

Step 5: Edit and synchronize in Camtasia Studio.

Save and edit the video. Set it to the recording dimensions of your final output, and set the background colour to white.

Use Visual Effects > Remove a Color to remove the pre-sketch. Now it looks like you're drawing on a blank canvas. See my previous notes for a demo.

Now synchronize the video with the audio. You may want to add markers to your audio so that you can easily tell where the significant points are. Use the timeline to find out the duration between markers. Split your video at the appropriate points by selecting the video and typing s. Use clip speed (right-click on the segment) to adjust the speed until the video duration matches what you need.

Note that at high clip speeds, Camtasia drops a lot of frames. If this bothers you, you can render the sketch at 400% speed using Camtasia or Movie Maker, produce that as an AVI or MP4, re-import that media, and continue compressing it at a maximum of 400% speed each time until you get the speed you want.

If you need to cover up a mistake, a simple white rectangular callout can hide that effectively. If you need to make something longer, extend the frame. Because you can't extend frames into video that's already there, you may want to drag the segment onto a different track, and then split or cut the excess.

Produce the synchronized video in your required output format (ex: MP4, MOV…) and you're done!

Hope this workflow helps you get into doing more animated sketches with Autodesk Sketchbook Pro and Camtasia Studio on a laptop or desktop computer. Do you use other tools or other workflows? Please share!

How to cheat when animating sketches

| drawing, geek, process, tips

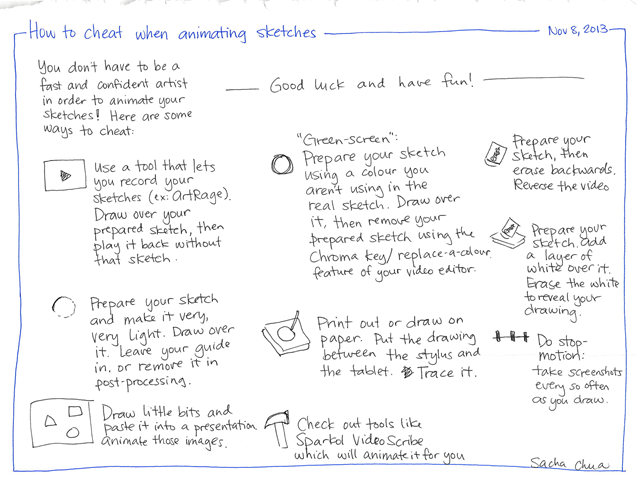
I’ve been working on some animations for my consulting engagement. My new “green-screen” workflow involves Camtasia Studio’s Replace a Color feature, a large secondary motor, and the Cintiq 12 WX (although any USB tablet will probably do fine). It works really well! I re-rendered my 4-minute video because I wanted to use the WAV export as the audio instead of the MP3 export – better audio quality.

My old workflow (Artrage Studio Pro script recording and then some text manipulation to get it to save frames) ran about 4 hours per audio minute. This one’s at about two hours per audio minute, and it could take even less of my time if I could delegate the editing and synchronization to someone else. (Not for this one because of the contract, but maybe next time!)

Here are some other ways to cheat when animating sketches. Click on the image for a larger version.

2013-11-08 How to cheat when animating sketches

No samples, sorry, but maybe I’ll plan my own animations after this consulting project is finished.

In the meantime, here’s a quick glimpse of how to use Remove a Color in Camtasia Studio:

My new Google Hangouts On Air checklist, plus upcoming Nov 29 Q&A on learning

Posted: - Modified: | process, youtube, streaming

Google Hangouts On Air is a quick, free way to have a videocast with up to 10 participants and as many passive watchers as you want, thanks to streaming through YouTube. The stream is about 20 seconds delayed and the commenting interface is still kinda raw, but as a quick way to set up and broadcast video chats, it’s hard to beat that.

I picked up a lot of great ideas from Pat Flynn’s first Q&A Hangout. He used ChatWing to set up a chat room that everyone could join, and the experience was much smoother than using CommentTracker or something like that.

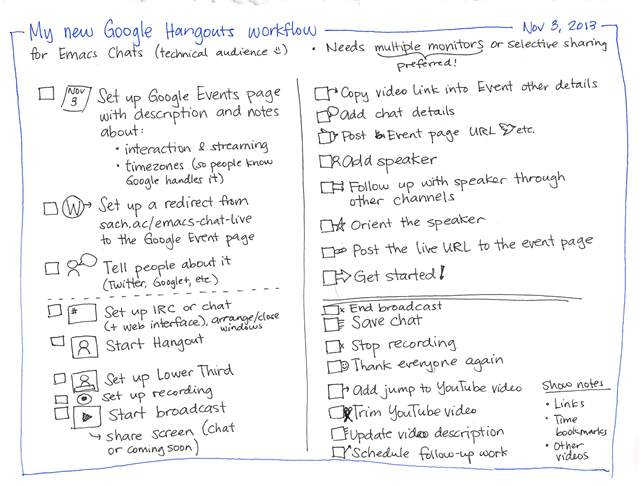
Here’s my new Google Hangouts On Air workflow for the Emacs Chats series I’ve been doing. Since the Emacs crowd is fairly technical, I used IRC as my chat room, with a web interface for others who didn’t have an IRC client handy. (Naturally, I used ERC to chat on IRC from within Emacs.) Having other people around worked out really well, because I could take a break and ask other people’s questions. =)

2013-11-03 My new Google Hangouts workflow

The other new thing I tried this time around was starting the broadcast really early (like, half an hour early) and setting it to share my screen with the coming-soon information, which meant that I could post the streaming URL in lots of different places.

I’d like to expand this to doing regular Hangouts On Air Q&As or conversations. How about we use the sach.ac/live URL to point to the next Hangout On Air I’ve scheduled? As of this writing, this will be a Q&A on November 29 on learning and note-taking. We’ll probably stream it over YouTube and have a chat room for discussion/Q&A. Want to pick my brain? See you then!

(Want more one-on-one help? Book a Helpout session – there’s a nominal charge to keep slots available instead of letting no-shows book them all.)

Daily drawing update: So far, fantastic!

Posted: - Modified: | drawing, process

I’ve been pushing a lot of sketches through my evolving workflow. This is fantastic. In the past 20 days, I’ve done 100+ of these thinking-on-paper drawings, about 70+ of which are public. It’s fun to turn the sketches into blog posts afterwards. I find them more motivating to flesh out than headlines or outlines, so you’ll probably see a lot more sketches in this blog. (See, I’m learning more about illustrating my blog after all!)

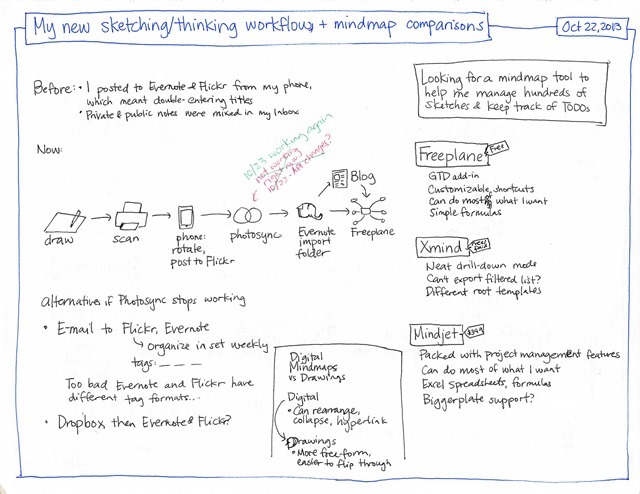
This is my workflow now:

  1. I draw a thought on paper using black, blue, red, and green pens.
  2. I scan the sheets using ScanSnap and my phone, which can rotate and publish images to Flickr more conveniently than my computer can. (It’s funny how that works.)
  3. Photosync automatically downloads the images from Flickr to folders monitored by Evernote, so they’re imported into my !Inbox notebook.
  4. If I want to colour the image, I use Autodesk Sketchbook Pro and re-save the JPGs to the Evernote attachment folder as well as the Photosync folder, which updates the Flickr image.
  5. Before I move the Evernote item to my public notebook, I tag it, copy the note link, and add the entry to my Freeplane mindmap so that I have a hyperlinked overview (sneak preview of my map: Mapping what I’m learning).

My new sketching and thinking workflow, and mindmap comparisons

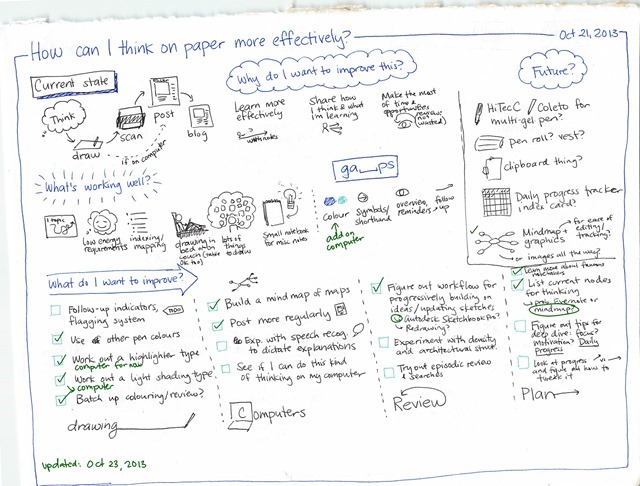
One of the nice things about a limited canvas (whether paper or digital) is that there’s a natural end to your drawing. You run out of thoughts or you run out of space. Either way, that’s a good time to stop and think about what you need to do next. In a text outline or a mindmap, I can just keep going and going and going.

image

I’ve been thinking about how I can do things even better. As it turns out, assigning Autodesk Sketchbook Pro as the default application for handling JPGs lets me easily edit images stored in Evernote. Freemind lets me add markers to map nodes, so that’s a halfway-decent flagging system (no electronic equivalent of Post-It flags on the image itself, though). I’m looking forward to turning this kind of focus on something that isn’t related to learning or drawing. It’ll be interesting to see if visual thinking does well for deep dives in other areas too, although I suspect it will.

How can I think on paper more effectively

Ooh, wouldn’t it be nice to have an easy way to resize, upload, and synchronize images so that I can save new versions and have previous blog posts updated? Someday…

Anyway, here we are! I should do a video about all the different pieces – the workflow’s pretty sweet, actually. As awesome as my digital sketchnoting workflow? I don’t know. They’re great for different reasons, and I’m glad I’m adding more tools to my toolbox. =)

Here’s the recording from “How to use Evernote to improve your visual thinking”

| process, visual

Check out my Evernote resource page for the one-page summary and Q&A. Enjoy!

How I set up Autodesk Sketchbook Pro for sketchnoting

Posted: - Modified: | drawing, process

UPDATE 2014-02-10: Check out my free/PWYW downloadable resources for Autodesk Sketchbook Pro: the grid I use, the brushes, and a PSD that has the grid and a blank layer.

—-

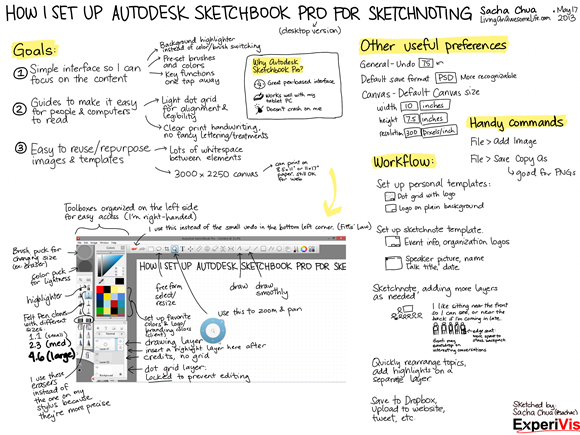
Matt just got a tablet, so he wanted to know how I set up Autodesk Sketchbook Pro for my sketchnoting. See the sketchnote below for my layout and brush sizes, and a few other tips. =) I sometimes tweak brush sizes depending on the size of the project, but they’re roughly around that proportion (1.1-1.3, 2.3-2.5, 4.6 or so).

How I Set Up Autodesk Sketchbook Pro for Sketchnoting

The dot grid I use works out to roughly 40 pixels square with dots that are 5 pixels or so in diameter. If I draw small letters at 1 grid unit (~40px) high, this is mostly readable when printed on 8.5”x11” and requires a little scrolling and zooming when viewing on the computer. I usually draw titles at 2-3 grid units high (80 or 120 pixels). Sometimes I use the dot grid just as a guide for keeping letters mostly level, and I pick a size in between.