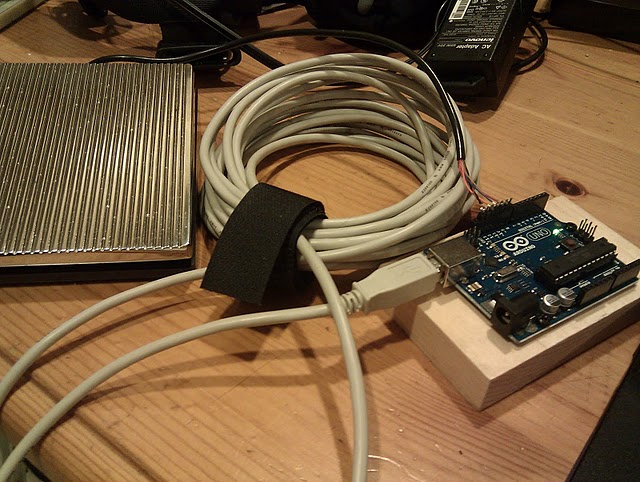
Code and circuit for a six-function Arduino-based USB footswitch
Posted: - Modified: | geek, sketchesI’d been thinking about footswitches for a while, but I held off on buying one because they were expensive. Turns out that building your own is easy, even for someone with limited electronics experience. I do have the unfair advantage of having a spouse who’s an electrical engineer, but I figured out this circuit and code by myself!
The hardware for this circuit is really simple. If you’re lucky, you might find a three-way foot switch at your local audio-equipment-carrying surplus shop. If not, you could make your own, but I haven’t tried doing that yet. =)
The fun part is in the code that makes this a six-function USB keyboard. The code below maps left, center, and right short presses to F13, F14, and F15, while left, center, and right long presses send F16, F17, and F18. Here’s the code:
const int redPin = 9;
const int tanPin = 10;
const int bluePin = 11;
const int orangePin = 12;
const int debounceDelay = 150;
const int longPressThreshold = 650;

int currentState;
int lastSwitch;
long lastDebounce;
long lastPressed;
int lastSwitchDebounced;

uint8_t buf[8] = { 0 };	/* Keyboard report buffer */

#define SWITCH_NONE 0
#define SWITCH_LEFT 1
#define SWITCH_CENTER 2
#define SWITCH_RIGHT 3

#define STATE_WAITING 0
#define STATE_SHORT_PRESSED 1
#define STATE_LONG_PRESSED 2

#define KEY_F13	0x68
#define KEY_F14	0x69
#define KEY_F15	0x6A
#define KEY_F16	0x6B
#define KEY_F17	0x6C
#define KEY_F18	0x6D
#define KEY_F1D	0x6E
#define KEY_PAGEUP 0x4b
#define KEY_PAGEDOWN 0x4e

void setup() {
  pinMode(redPin, INPUT); digitalWrite(redPin, HIGH);
  pinMode(tanPin, INPUT); digitalWrite(tanPin, HIGH);
  pinMode(orangePin, INPUT); digitalWrite(orangePin, HIGH);
  pinMode(bluePin, INPUT); digitalWrite(bluePin, HIGH);
  Serial.begin(9600);
  delay(200);
  lastSwitch = 0;
  lastDebounce = millis();
  currentState = 0;
}

int getCurrentSwitch() {
  if (!digitalRead(orangePin)) { return SWITCH_LEFT; }
  if (!digitalRead(tanPin)) { return SWITCH_CENTER; }
  if (!digitalRead(redPin)) { return SWITCH_RIGHT; }
  return SWITCH_NONE;
}

void sendKey(int currentSwitch, boolean isShort, boolean keyDown) {
  buf[0] = 0;
  buf[1] = 0;
  int debug = 0;
  if (keyDown) {
    switch (currentSwitch) {
        case SWITCH_LEFT: buf[2] = isShort ? KEY_F13 : KEY_F16; break;
        case SWITCH_CENTER: buf[2] = isShort ? KEY_F14 : KEY_F17; break;
        case SWITCH_RIGHT: buf[2] = isShort ? KEY_F15 : KEY_F18; break;
    }
    if (debug) {
      Serial.println(currentSwitch);
      Serial.println(((int) buf[2]) - KEY_F13);
      Serial.println("Down");
      Serial.println(isShort ? "Short" : "Long");
    }
  } else {
    buf[2] = 0;
    if (debug) { Serial.println("Up"); Serial.println(isShort ? "Short" : "Long"); }
  }
  if (!debug) { Serial.write(buf, 8); }
}

void loop() {
  int currentSwitch = getCurrentSwitch();
  if (currentSwitch != lastSwitch) {
    lastDebounce = millis();
  }
//  Serial.println(currentSwitch);
  // Debounce it
  if (millis() - lastDebounce > debounceDelay) {
    switch (currentState) {
      case STATE_WAITING:
        // No keys pressed yet
        if (currentSwitch != SWITCH_NONE) {
          lastPressed = millis();
          currentState = STATE_SHORT_PRESSED;
        }
        break;
      case STATE_SHORT_PRESSED:
        // Wait to see if this counts as a long press
        if (currentSwitch == SWITCH_NONE) {
          // Send the keystroke
          sendKey(lastSwitchDebounced, true, true);
          sendKey(lastSwitchDebounced, true, false);
          currentState = STATE_WAITING;
        } else if (currentSwitch != lastSwitch) {
          // Shouldn't happen, but just in case you're using a different footpedal...
          sendKey(lastSwitchDebounced, true, true);
          sendKey(lastSwitchDebounced, true, false);
          lastPressed = millis();
        } else if (millis() - lastPressed > longPressThreshold) {
          currentState = STATE_LONG_PRESSED;
          sendKey(lastSwitch, false, true);
        }
        break;
      case STATE_LONG_PRESSED:
        // Wait for the transition
        if (currentSwitch == SWITCH_NONE) {
          currentState = STATE_WAITING;
          sendKey(lastSwitch, false, false);
        } else if (currentSwitch != lastSwitch) {
          // Likewise, switching between inputs shouldn't happen with this footpedal,
          // but just in case...
          sendKey(lastSwitch, false, false);
          currentState = STATE_SHORT_PRESSED;
          lastPressed = millis();
        }
    }
    lastSwitchDebounced = currentSwitch;
  }
  lastSwitch = currentSwitch;
}
After you upload the code to the Arduino, you’ll also need to reflash the ATMega8U2 chip so that it can act like a USB keyboard. This sounds scary, but the instructions on the Arduino site can help you. When you’ve gotten the hang of reflashing the ATMega8U2 with the standard firmware, reflash it with the Arduino-keyboard-0.3.hex (Uno) or Arduino-keyboard-0.3-mega2560.hex (Mega) firmware from Arduino Hacking. After you reflash, unplug, and re-plug your Arduino, it should now appear as a keyboard. If you made a mistake, don’t panic. Just reflash the standard firmware onto it, and you can upload new programs again.
The last step is to map the F13..F18 function keys to something useful on the computer. I do this in software instead of hardcoding it into sendKey so that I can easily change the keycodes without reflashing the device. I’m on Windows 7 for work and other reasons, so I use AutoHotkey to map the keys. For example, the following AutoHotkey code maps left and right to Page Up and Page Down, and the center to Alt-Tab.
F13::Send, {PgUp}
F14::Send, !{Tab}
F15::Send, {PgDn}
This is a great combination for, say, reading an e-book while eating noodles.
On Linux, you can use Xmodmap or XBindKeys to remap your keys. For the Mac, KeyRemap4MacBook might work – haven’t tried it, though.
Picture!
Making a USB footswitch turned out to be an easy and fun weekend Arduino project. Hope you can build on this idea for more awesomeness! =) I’m looking forward to finding my next project idea. Hmm…


