Tags: tmtp

RSS - Atom - Subscribe via email

Python + sewing: Making basic shapes and splitting up larger patterns

Posted: - Modified: | geek, sewing

More Python and sewing. =) The first step was to make parameterization even easier by allowing command-line specification of measurements. I refactored some code from client.py and modified mkpattern to accept the new arguments, splitting up the name and value based on regular expressions (commit). That way, I could quickly generate patterns based on different dimensions, like so:

python ../mkpattern --client=../customer/Sacha/sacha-cm.json \
   --pattern=../patterns/box_tote.py \
   --styles=../tests/test_styles.json \
   -m height=4in -m width=7.5in -m seam_allowance=0.5in \
   -m depth=7.5in -m strap_width=1in -m strap_length=10in -m hem_allowance=1in \
   ../foo.svg

I sketched basic patterns for cylindrical and box-type containers the other day, so I wanted to try them out. It turned out that the Python framework I used for sewing patterns didn’t yet support arcs. Adding the arc element to the SVG was straightforward. I initially faked the bounding box for the arc, but since that made the code misbehave a little, I looked around for a better implementation. I translated the code from this post from 2011 to Python and added it to the code (git commit). That allowed me to make a simple cylinder pattern generator. I haven’t tested it yet, but it looks reasonable.

2015-10-27 20_30_11-foo.svg
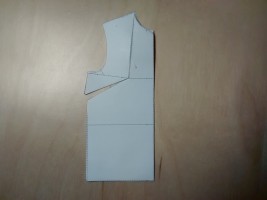
The box tote was interesting to work on. When I did the math, I couldn’t believe that the calculations were that simple. I was waiting for a 
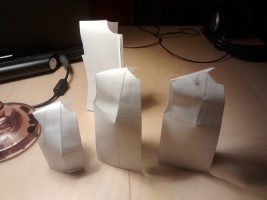
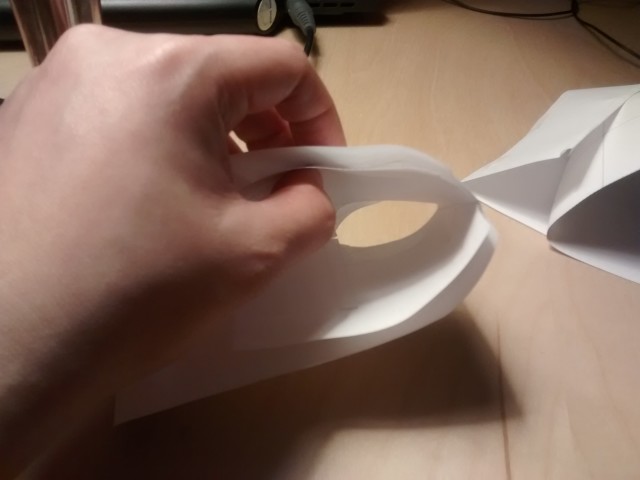
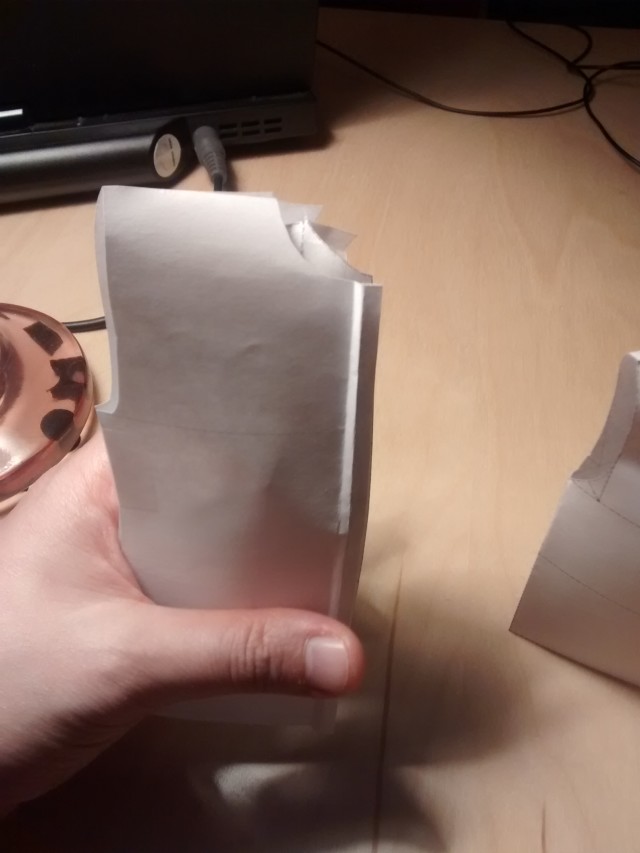
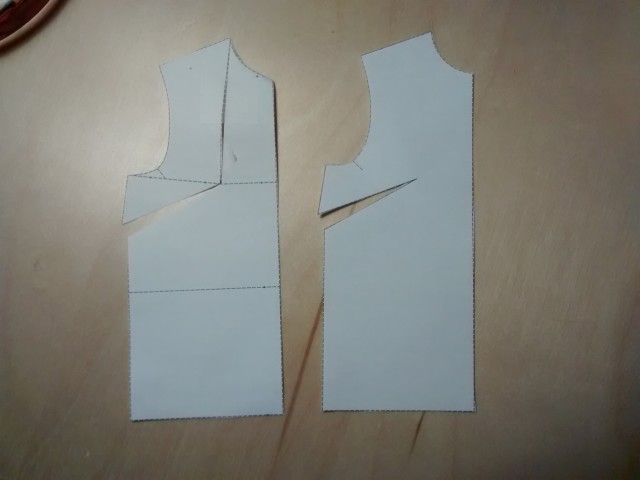
sqrt or a cos to show up, I think. Still, the small-scale paper version I taped up looks like it makes sense, and I’ll sew a full-size version soon. J- asked for a light blue lunch bag that would fit our standard containers, and I’ve been meaning to make a casserole carrier for a while now. It would be handy to be able to make bags that are the right size. Too small and things don’t lie flat, too big and they move around too much.

2015-10-27 20_31_54-foo.svg - Inkscape

I spent most of my time making a flexible circle skirt pattern, pretzeling my brain around circumferences, angles, multiple pieces, and fullness multipliers. I’m happy with the way it turned out. It can generate patterns for quarter-circle skirts, half-circle skirts, full-circle skirts – even an arbitrary fraction of skirt fullness split into an arbitrary number of pieces, with optional seam allowance, waist seam allowance, and hem allowance. If you give it the fabric width, it will split the pattern into however many pieces are needed. If you specify a seam allowance and you want a full-circle skirt in a single piece (maybe for dolls), it’ll leave room for the seam allowances by adjusting the inner radius. We’re heading into snow pants season, so I probably won’t get around to testing it in fabric for a while. Caveat netrix, I guess.

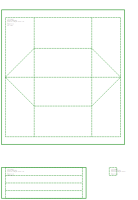
I also got around to writing a tool for splitting up large patterns so that I could print them on a regular printer. I had tried Posterazor and a few other tools for splitting up large images into smaller pages, but I wanted something that would add cutting lines and page numbers. It turns out that all you need to do is change the SVG’s height, width, and viewPort. I added a rectangle for the cutting line and some text for the page numbers. I haven’t figured out how to use pysvg to replace the contents of an existing text element, but since the tool prints out non-overlapping regions, I just keep adding more text elements. My script creates a numbered sequence of SVGs. I haven’t found a convenient way to print multiple SVGs in one go, but I can select multiple PNGs and print those, and I can use Inkscape’s command line to convert SVGs to PNGs like so:

inkscape -z -e output-01.png -d 300 output-01.svg

There’s supposed to be a -p command to output Postscript ready for printing, but command-line printing on Windows doesn’t seem to be as much of a thing as it is on Linux. Something to figure out another time, maybe. Anyway, now that I have a conversion pipeline, I can write a Bash script or Emacs Lisp to process things automatically.

I’ll probably move from all this theoretical script-writing to more hands-on sewing during the rest of the week. My fabric order has arrived, so I’ve got a bit of cutting and sewing ahead of me.

Hmm. With the command-line measurement and scaling overrides, it might be interesting to use this framework for papercraft and laser-cutting too. Someday!

Programmatically rescaling and manipulating the darts in sewing patterns

Posted: - Modified: | geek, sewing

I’ve been playing with the tmtp project for programmatically generating SVGs based on body measurements in order to create basic blocks and sewing patterns (see my previous blog post). I’m not yet at the point of being able to look at an image and see if it will sew correctly. However, printing and taping up large patterns is frustrating and a waste of paper. Scaling the patterns down so that they fit on a single page of paper makes perfect sense. With the measurements I’m working with, a scale of 0.2 (1″ : 5″) makes things fit neatly on 8.5″x11″ paper. It’s easy enough to cut them out and tape them up into something that resembles the form.

Here’s the commit that adds the scaling factor, and the commit that adds a very useful --scale command-line option. This lets me do something like this:

python mkpattern --verbose \
  --client=customer/Sacha/sacha-cm.json \
  --pattern=patterns/dart_manipulation_example.py \
  --styles=tests/test_styles.json --scale=0.2 output.svg

I generated a bunch of SVGs using my measurements, printed and cut them, and taped them up. Tada! They look like they make sense. The easy-fitting bodice block from Metric Pattern Cutting is, as expected, looser than the close-fitting bodice block, and both are a little bit bigger than the basic bodice block from BurdaStyle.

2015-10-26 16.17.312015-10-26 16.20.17

The basic shirt pattern from Cal Patch’s Design-it-Yourself Clothes fits over the basic blocks, as expected. It looks a little boxy compared to the blocks, but it will probably be fine in cotton, since cotton won’t be as stiff as paper.

2015-10-26 16.18.49

If I end up doing this a lot, I’ll probably look into modifying the patterns to draw an outline on a separate layer. Then I can convert the SVG for use with Hacklab’s laser cutter (see my previous experiments and fun results), so I can easily test with paper or fabric.

I was thinking about the viability of printing a small, to-scale 3D model based on measurements. Doesn’t have to be a photorealistic 3D scan of me – apparently you can get photorealistic 3D prints for about ~$120 these days, but that’s still a bit much. If it’s not from a scan, though, there’s the challenge of generating a good model based on entered measurements, or creating/adjusting an existing model of a dress maker’s mannequin. Anyway, papercraft with basic blocks seems to be a decent starting point. =)

With the scaling factor in place, I did the math for dart manipulation. Darts help add shape to fabric, turning flat pieces into slightly conical structures. If you wanted to move a dart on paper, you could tape the dart closed, then cut a new line to the apex of the dart and spread the pattern until it’s flat again. (Wikipedia describes this as slash-and-spread.)

There’s an SVG rotate transformation that would probably make it easier to handle the rotation of complex shapes. I haven’t figured out how to add an SVG group in tmtp yet, though. Instead, I:

  1. Added a pair of points where my “cut” was going to be
  2. Calculated the existing dart angle
  3. Rotated one of the dart points, one of the new cut points, and the points in between – to make things easier, I specified which points to rotate
  4. Redrew the front bodice

I added a few library functions, so now the code to rotate a dart is pretty short. It takes an array defining the dart points (start, apex, end), and another array of the points to rotate around the apex by the calculated angle.

def rotateDart(self, dart_points, points_to_rotate):
    # Determine the angle of rotation
    angle = angleOfVectorP(dart_points[0], dart_points[1], dart_points[2])
    # Rotate the dart closed
    (dart_points[0].x, dart_points[0].y) = rotateP(dart_points[0], dart_points[1], angle)
    # Rotate the rest of the points
    for i in range(len(points_to_rotate)):
        (points_to_rotate[i].x, points_to_rotate[i].y) = rotateP(points_to_rotate[i], dart_points[1], angle)
    return

When I printed out my test pattern and cut it, the new pattern matched the result of slashing and spreading the dart on the previous bodice. Hooray for paper testing!

2015-10-26 18.27.54

The next step would probably be to make an SVG slicer that converts large patterns into segments that can be printed on a home printer. It would probably move/clip the image, add cutting lines and labels for convenience, and export a series of SVGs. If I’m lucky, I might be able to find a Python library that will let me easily create a multi-page PDF.

More thoughts on sewing and programming: it would be nifty to be able to easily program variable seam allowances, so that I could say that one seam has a 1/2″ allowance and the other has a 2″ hem allowance. Lines should be pretty straightforward – just offset a parallel line by the specified distance. Bezier curves might be a challenge. In “An offset algorithm for polyline curves” (Liu, Yong, Zheng, and Sun, 2006), the authors describe a algorithm involving trimming the offset curves of a polyline curve. I should check out the approximation algorithms mentioned in their literature review – might be an easier thing to start with, especially if I can wrap my head around the way the existing code’s curveLength function interpolates curves. Or I can leave the addition of variable allowances as a human step. It’s not that hard with a seam allowance ruler. Still, it would be neat to have laser-ready SVGs… =)

Anyway, now that I’ve got a simple way to test things on a small scale and a bit more of a handle on the math, I’m looking forward to playing around with generating actual patterns instead of just basic blocks. Whee!

Pattern-making: Generating SVGs for sewing with Python and tmtp

Posted: - Modified: | geek, sewing

I like sewing simple clothes, and I’d like to be able to continue doing that even as measurements change without having to rely on commercial patterns that would need to be manually adjusted anyway. I also want to experiment with computer-assisted cutting, like the way the laser cutter at Hacklab.to made it super-easy to precisely cut the same top in different fabrics.

In sewing, there’s the idea of drafting a pattern based on a set of measurements and a few calculations. You could do this with a large roll of paper, a ruler, and some way to draw a smooth curve (French curves, hip curves, or even tracing around the edge of a plate). There are software programs to do this as well, but the commercial ones tend to cost a lot if you want one that automatically drafts the rest of the pattern based on your measurements. Still, you can translate the manual instructions to digital form by drawing the appropriate lines and curves in a vector drawing program such as Inkscape or Adobe Illustrator.

While researching open source options for pattern-making, I came across Tau Meta Tau Physica (tmtp). At its core, it’s a Python script that produces an SVG based on a programmed pattern and a set of measurements. With a little fiddling (downgraded pySVG, fixed some case sensitivity issues), I got it working on my system.

Both documentation and actual code samples were pretty sparse, but I figured out the basics by reading the library code and the test patterns. I spent the day working on translating some of the basic patterns from Cal Patch’s book Design-It-Yourself Clothes: Pattern Making Simplified. So far, I’ve put together plausible-looking replicas of the A-line skirt and the basic shirt.

One of the nifty things about writing programs to draft patterns is that I can use the library functions to calculate the lengths of the cubic Bezier curves I’m using for necklines and armholes. This is handy when calculating collar length or adjusting sleeve caps. In particular, it’s neat to be able to use a loop to adjust the sleeve cap by offsetting the bicep point, although I’ll probably tweak the algorithm because it might be good to balance that with other ways to adjust that sleeve cap length.

I still haven’t tested the patterns, though, and I’m not even sure I’m collecting all these measurements correctly. At some point, I’ll print them out and sew a muslin yet. It would be good to test the sleeve cap. But the patterns look reasonable, so that’s a start.

Here are some screenshots based on my current measurements, and some links to the patterns on Github:

A-line skirt: My default measurements have this skirt sitting at my natural waist, although I’ll probably drop the waistline a bit lower before sewing it.

2015-09-29 20_57_39-foo.svg

Basic shirt: Totally untested. Would be interesting to see if this sleeve actually works, or what needs tweaking.

2015-09-29 20_59_55-_foo.svg - Inkscape

I’ll work on encoding the Burda bodice block, and then I can use that to sanity-check the shirt. Then there’s figuring out poster printing, taping up the pattern, and trying it out. Looks promising, though! I’m still boggled that the math I did for squaring lines seems to actually work. Now if only I can figure out proper seam allowance calculations instead of leaving that as a post-processing step in Inkscape or on paper…

My Github fork of tmtp