Laser cutting registration experiments and cutting long pieces of fabric
| geek(aka Things Other People Probably Already Knew About the Hacklab Laser Cutter But That I Wanted to Figure Out =) )
For sewing purposes, I want to eventually be able to accurately cut pieces that are larger than the laser bed (22×18″). The approach that other people had recommended for large cuts is to laser-cut a piece of paper, then position material on top of it. This works really well for acrylic and other clear materials, but it’s a bit trickier with fabric.
I was curious about the following questions:
- Do the cutting bounds coincide with the mat if the grid has been removed? If so, then placing material would be much easier.
- Can you use registration markers to make the process of shifting opaque material easier?
- Can you build pauses into laser programs to make it easier to reposition material or adjust power?
- Do you need to keep stroke width in mind when setting the X and Y locations for paths in Inkscape? That is, when you set the X and Y, does it use the path (which is what’s used for cutting), or does it use the stroke width?
- Is the lowest leftmost position stable? That is, if you rehome the laser and then use the joystick to move it to the minimum X and Y the hardware will let it reach, does that position stay the same even if you repeat the process?
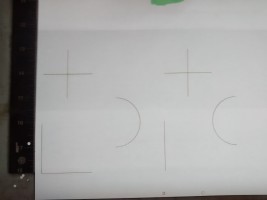
To explore these questions, I created an SVG that had
- L-shapes to define the corners
- a couple of crosshairs for shifting, and an additional reference line that could be checked against the X=0 line
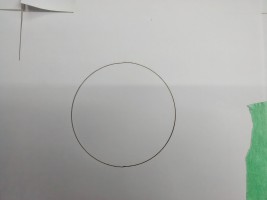
- two half-circles that would become one circle after shifting
Since Inkscape’s Gcode tools export the path names, I used Path – Combine to group related paths and the Object Properties dialog to rename them. This allowed me to edit the resulting Gcode, move the path for the second half-circle to the end of the file, and add an M0 pause before it. I taped paper down to cover the four corners. After processing the file with the sed scripts used to tweak things for our laser, I ran it.
Here are the results:
1. The cutting area does not coincide with the rulers or the mat.
I homed the laser and then touched off at the minimum X and Y positions that the hardware would let me reach. The lines I cut for the upper corners are slightly skewed away from the built-in ruler, which means that it cannot be used for alignment.
2. Registration marks allow for reasonable precision in large cuts.
The circle above is formed from half-circles, cut in two passes separated by a reposition. I started with two sheets of paper taped to the lower left corner: one to move, and one to act as a reference. After I made the first cut, I repositioned the top layer of paper so that the crosshair on the right was on top of the crosshair on the left and the reference line I cut was aligned with the lower left corner. Folding the quarters of the crosshair back helped me verify its position. I taped the top layer of the paper down and proceeded with the second cut. This simple registration process produced a cut that’s not completely accurate, but which is manageable for the kind of work that I want to do. It could probably be refined with additional crosshairs, boxes, or other registration shapes.
(Update: Boxes work wonderfully.)
3. You can use the M65 P0 and M0 operations to add a pause to your G-code program, but the program will be reset if you raise the lid of the laser.
The M0 operation pauses the program, and you can continue it by clicking on the pause button in the controller. However, when you raise the lid of the laser to reposition material, the controller loses the connection to the laser. After you reestablish the connection, the controller is no longer in pause mode, and you need to start the program from the beginning.
Because my G-code was relatively simple, I chose to re-run the program with zero power. When I reached the pause, I set the power to level 1 and continued with the program. This may be a good way to handle larger cuts if you want to keep the design in a single G-code file. Here’s a snippet showing the pause code.
M63 P0

(End cutting path id: upperleft)

M65 P0
M0

(Start cutting path id: secondhalfcircle)
(Change tool to Default tool)

M63 P0
M65 P0 turns off the laser immediately (instead of being synchronized with motion), and M0 pauses the program until it’s continued from the controller.
If you don’t want to pause and rerun, you can always split your cuts into separate G-code files. Dividing your SVG into layers makes it easy to select all the paths on a given layer before running the G-code export tool.
4. Inkscape takes stroke width into account when you move paths using X and Y, so be consistent about your positions.
If your stroke width is 1 px, then a line drawn on top of a 1″ grid from (0,0) to (0,2) will start at (-0.006″, -0.006″) and have a height of 2.006 inches. This can still be cut. If you move it to (0,0), the actual line itself will be offset by a tiny bit, although I’m not sure how much difference it would make when cutting. Anyway, when creating registration marks, make sure you have a consistent offset between your registration marks and the path to cut, and that you use a consistent stroke width (even if the laser cutter ignores that width). Make sure you turn off the default preference that scales stroke widths whenever you resize something (Edit – Preference – Behavior – Transforms – Scale stroke width, or use the fourth icon from the right of the top toolbar).
5. The lowest leftmost position appears to be stable.
If you home the laser, then use the joystick to move to the minimum X and Y position you can reach in the lower left, and you use the GUI controller to touch off at that point so that all coordinates are relative to that position, then your cuts will be in the same place each time. This appears to be true even after you rehome the laser and re-touch-off, and even after you turn off the laser and restart Linux EMC2. This means we could probably mark off the outside limits of the cutting area on the mat using something that’s laser-safe, and then people could use those as reference lines. On the temporary side, there’s taping down paper and using that as a guideline, which people are used to already.
Whee! So with the results above, I should now be able to make decently-precise long cuts in fabric…
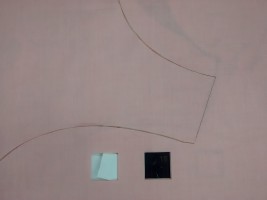
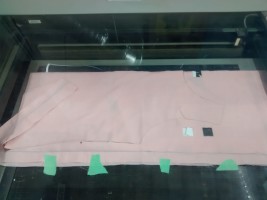
MWAHAHA. Behold the power of the laser cutter. The pattern pieces are about 23″. This is the picture of a cut after the piece has been shifted so that the registration squares on the right of the fabric is over the registration squares on the left on my reference piece of paper. There’s a barely-perceptible jog in the line, and since that’s in the seam allowance instead of in a design, it’s totally okay.
All right! See files at https://github.com/sachac/laser if you want to explore.
Accurately tracing and cutting patterns makes the rest of sewing so much easier because you can go by the seam allowances. Since long cuts on fabric turn out to be Not That Scary, I can use this for cutting the pieces to sew together. For fabric that is harder to handle or laser-cut, I can use the laser to cut pieces that I can then pin to the real fabric for hand-cutting (since fabric patterns can be easier to handle than paper). Mwahaha!


