Tags: python

RSS - Atom - Subscribe via email

Having fun kerning using Org Mode and FontForge

Posted: - Modified: | emacs, org

It turns out that working with font bearings and kerning tables using Org Mode makes lots of things so much easier.

Bearings in the top left, kerning matrix in the top right

While trying to figure out kerning, I came across this issue that described how you sometimes need a character-pair kern table instead of just class-based kerning. Since I had figured out character-based kerning before I figured out class-based kerning, it was easy to restore my Python code that takes the same kerning matrix and generates character pairs. Here's what that code looks like.

def kern_by_char(font, kerning_matrix):
  # Add kerning by character as backup
  font.addLookupSubtable("kern", "kern-2")
  offsets = np.asarray(kerning_matrix)
  classes_right = [None if (x == "" or x == "None") else x.split(",") for x in offsets[0,1:]]
  classes_left = [None if (x == "" or x == "None") else x.split(',') for x in offsets[1:,0]]
  for r, row in enumerate(classes_left):
    if row is None: continue
    for first_letter in row:
      g = font.createMappedChar(first_letter)
      for c, column in enumerate(classes_right):
        if column is None: continue
        for second_letter in column:
          if kerning_matrix[r + 1][c + 1]:
            g.addPosSub("kern-2", second_letter, 0, 0, kerning_matrix[r + 1][c + 1], 0, 0, 0, 0, 0)
  return font

I wanted to be able to easily compare different versions of my font: my original glyphs versus my tweaked glyphs, simple spacing versus kerned. This was a hassle with FontForge, since I had to open different font files in different Metrics windows. If I execute a little bit of source code in my Org Mode, though, I can use my test web page to view all the different versions. By arranging my Emacs windows a certain way and adding :eval no to the Org Babel blocks I'm not currently using, I can easily change the relevant table entries and evaluate the whole buffer to regenerate the font versions, including exports to OTF and WOFF. Here's the code for that:

<<params>>
<<def_import_glyphs>>
<<def_set_bearings>>
<<def_kern_classes>>
<<def_kern_by_char>>
font = fontforge.font()
font = import_glyphs(font, params)
font = set_bearings(font, bearings)
save_font(font, {**params, "new_otf": "sachacHandRaw.otf"})
font = kern_classes(font, kerning_matrix)
font = kern_by_char(font, kerning_matrix)
save_font(font, {**params, "new_otf": "sachacHandRawKerned.otf"})
font = load_font('SachaHandEdited.sfd')
font = set_bearings(font, bearings)
font.removeLookup('kern')
save_font(font, {**params, "new_otf": "sachacHandEdited.otf"})
font = kern_classes(font, kerning_matrix)
font = kern_by_char(font, kerning_matrix)
save_font(font, {**params, "new_otf": "sachacHand.otf"})

I also like the way it's pretty easy to update multiple kerning values without clicking around. I sometimes use FontForge to get the number to set it to and then copy that into my table, but I also sometimes just tweak the number in Org Mode directly.

To see the results, I can generate a test HTML that shows me text with different versions of my font. I can also look at lots of kerning pairs at the same time. Here are the components of that test page:

def test_css(fonts):
  doc, tag, text, line = Doc().ttl()
  with tag('style'):
    for f in fonts:
      text("@font-face { font-family: '%s'; src: url('%s'); }" % (f[0], f[1]))
      text(".%s { font-family: '%s'; }" % (f[0], f[0]))
    text("table { font-size: inherit; font-weight: inherit }")
    text("td { text-align: left }")
    text(".blog-heading { font-weight: bold; font-size: 32px }")
    text(".default { color: gray }")
    text("body { font-family: woff, Arial, sans-serif; font-size: 32px; padding: 10px }")
  return doc.getvalue()
def test_html(strings):
  doc, tag, text, line = Doc().ttl()
  with doc.tag('table', style='border-bottom: 1px solid gray; width: 100%; border-collapse: collapse'):
    for s in strings:
      for i, f in enumerate(fonts):
        style = 'border-top: 1px solid gray' if (i == 0) else ""
        with tag('tr', klass=f[0], style=style):
          line('td', f[0])
          line('td', s)
  return doc.getvalue()
def test_kerning_matrix(kerning_matrix):
  doc, tag, text, line = Doc().ttl()
  with tag('table'):
    for r, row in enumerate(classes_left):
      if row is None: continue
      for first_letter in row:
        with tag('tr'):
          line('td', first_letter)
          for c, column in enumerate(classes_right):
            if column is None: continue
            for second_letter in column:
              klass = "kerned" if kerning_matrix[r + 1][c + 1] else "default"
              line('td', aglfn.to_glyph(first_letter) + aglfn.to_glyph(second_letter), klass=klass)
  return doc.getvalue()

This code actually generates the test file:

from yattag import Doc
import numpy as np
import aglfn
<<def_test_html>>
doc, tag, text, line = Doc().ttl()
fonts = [['raw', 'sachacHandRaw.otf'],
         ['raw-kerned', 'sachacHandRawKerned.otf'],
         ['edited', 'sachacHandEdited.otf'],
         ['woff', 'sachacHand.woff']]
strings = ["Python+FontForge+Org: I made a font based on my handwriting!",
           "Monthly review: May 2020",
           "Emacs News 2020-06-01"]
offsets = np.asarray(kerning_matrix)
classes_left = [None if (x == "" or x == "None") else x.split(',') for x in offsets[1:,0]]
classes_right = [None if (x == "" or x == "None") else x.split(",") for x in offsets[0,1:]]
with tag('html'):
  with tag('head'): 
    doc.asis(test_css(fonts))
  with tag('body'):
    line('h1', 'Test headings')
    with tag('div', klass="blog-heading"):
      doc.asis(test_html(strings))
    line('h1', 'Kerning matrix')
    doc.asis(test_kerning_matrix(kerning_matrix))
return doc.getvalue()

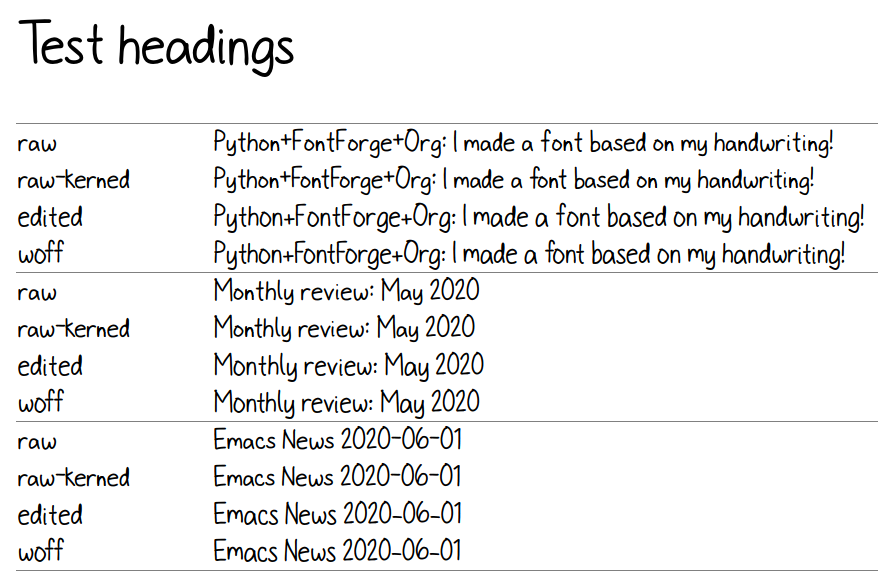
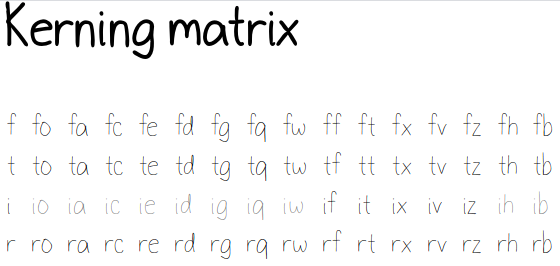
And here's what that test.html looks like:

Testing the font with a few blog headings
Kerning pairs: black for specified pairs, gray for defaults

Not bad… Now Emacs is my font editor! The code is at https://github.com/sachac/sachac-hand .

Python+FontForge+Org: I made a font based on my handwriting!

| emacs, geek, org

I wanted to make a font based on my handwriting using only free software. It turns out that FontForge can be scripted with Python. I know just a little about Python and even less about typography, but I managed to hack together something that worked for me. If you're reading this on my blog at https://sachachua.com/blog/ , you'll probably see the new font being used on the blog post titles. Whee!

My rough notes are at https://github.com/sachac/sachac-hand/ . I wanted to write it as a literate program using Org Babel blocks. It's not really fully reproducible yet, but it might be a handy starting point. The basic workflow was:

  1. Generate a template using other fonts as the base.
  2. Import the template into Medibang Paint on my phone and draw letters on a different layer. (I almost forgot the letter q, so I had to add it at the last minute.)
  3. Export just the layer with my writing.
  4. Cut the image into separate glyphs using Python and autotrace each one.
  5. Import each glyph into FontForge as an SVG and a PNG.
  6. Set the left side and right side bearing, overriding as needed based on a table.
  7. Figure out kerning classes.
  8. Hand-tweak the contours and kerning.
  9. Use sfnt2woff to export the web font file for use on my blog, and modify the stylesheet to include it.

I really liked being able to specify kerning classes through an Org Mode table like this:

  None o,a,c,e,d,g,q,w f,t,x,v,y,z h,b,l,i,k j m,n,p,r,u s T zero
None 0 0 0 0 0 0 0 0 0
f 0 -102 -61 -30 0 -60 0 -120 -70
t 0 -70 -41 -25 0 0 0 -120 -10
r 0 -82 -41 -25 0 -20 0 -120 29
k 0 -50 -81 -20 0 -20 -48 -120 -79
l 0 -41 -50 0 0 0 0 -120 -52
v 0 -40 -35 -30 0 0 0 -120 30
b,o,p 0 -20 -80 0 0 0 0 -120 43
a 0 -23 -60 0 0 0 0 -120 7
W 0 -40 -30 -20 0 0 0 -120 17
T 0 -190 -120 -60 0 -130 0 0 -188
F 0 -100 -90 -60 0 -70 -100 -40 -166
two 0 0 0 0 0 0 0 0 -53

I had a hard time defining classes using the FontForge interface because I occasionally ended up clearing my glyph selection, so it was great being able to just edit my columns and rows.

Clearly my kerning is still very rough–no actual values for j, for example–but it's a start. Also, I can probably figure out how to combine this with character pair kerning and have two tables for easier tweaking.

A- insisted on tracing my handwriting template a few times, so I might actually be able to go through the same process to convert her handwriting into a font. Whee!

Python, Org Mode, and writing Org tables to CSVs so that I can read them back

| emacs, org, writing

I’ve been getting deeper into Python so that I can model our personal finances. I really like using the pandas library to manipulate data. All those years I spent trying to juggle increasing complex spreadsheets… Working with Python code in Org Babel blocks is just so much more fun. I like being able to keep my assumptions in tables without having to fuss around with naming cells for easy-to-read formulas, slice and summarize parts of my data frames, organize my notes in outlines and add commentary, and define more complicated functions that I don’t have to squeeze into a single line.

I haven’t quite been able to tempt W- into the world of Org Babel Python blocks. Still, I don’t want to give up the awesomeness of having pretty tables that I can easily edit and use. So I have a bunch of named tables (using #+NAME:), and some code that exports my tables to CSVs:

#+NAME: tables
| Table         | Key                 |
|---------------+---------------------|
| assets_w      | Description         |
| assets_s      | Description         |
| tax_rates     |                     |
| disposition   | Asset               |
| probate_rates | Asset               |
| basic         | Client information  |
| base_expenses | Category            |
| general       | General assumptions |

#+begin_src emacs-lisp :results silent :var tables=tables :tangle no
  (defun my-tbl-export (row)
    "Search for table named `NAME` and export."
    (interactive "s")
    (save-excursion
      (goto-char (point-min))
      (let ((case-fold-search t))
        (when (search-forward-regexp (concat "#\\+NAME: +" (car row)) nil t)
          (next-line)
          (org-table-export (format "%s.csv" (car row)) "orgtbl-to-csv")))))
  (mapc 'my-tbl-export tables)
#+end_src

and some code that imports them back in, and formats tables nicely if I’m displaying them in Org. The in_org block doesn’t get tangled into index.py, so I don’t clutter command-line use with Org table markup.

#+begin_src python :results silent :tangle no
  in_org=1
#+end_src

#+begin_src python :results silent :exports code
  import pandas as pd
  import numpy as np
  import orgbabelhelper as ob
  def out(df, **kwargs):
    if 'in_org' in globals():
      print(ob.dataframe_to_orgtable(df, **kwargs))
    else:
      print(df)
    return df
#+end_src

#+begin_src python :results silent :var tables=tables :colnames yes
  for row in tables:
    table = row[0]
    index = row[1] 
    if row[1] == '':
      index = None
    globals()[table] = pd.read_csv(table + '.csv', index_col=index).apply(pd.to_numeric, errors='ignore')
    # print(globals()[table])
#+end_src

Then I can use C-c C-v C-b (org-babel-execute-buffer) to update everything if I change the table in my Org file, and I can use C-c C-v C-t (org-babel-tangle) to create an index.py that W- can read through or run without needing Org.